Wednesday 30 January 2013

Eduard 1/144 Me 109 G-2 - Part 2

Undercarriage up!
I mentioned that I was going to do some work to the undercarriage in order to model it in a realistic up position. Well I finished this off last night...


I also did some filling while I was at it. But you can see how the struts and wheels now look like they are in the correct flight position with the wheels laying under the struts. To do this I had to excavate out nice little alcoves inside the wheel wells so that the wheels looked as if they were under the struts. This involved scrapping away with the point of my scalpel until I had two suitably shaped indentations.

Of course this is just one way to do it, and it sort of belies my display modeler's ambitions rather than a war game modeler's practicality.

Wg Cdr Luddite, in a comment on part 1 of this project, pointed out the war gamer's approach quite succinctly...

"Don't worry too much about the undercart. The simplest way for a wargame model in 'flight mode' is to throw away the kit parts and just fill the recess with putty. (no one is ever going to look at the underside of aircraft during a game)."

...Er, oops, I suppose I could have done that really! Du-oh! Well I am a Kit Noob. LOL!


Tuesday 29 January 2013

I wonder - 1/144 Lysander thoughts


Diagram source: Wikipedia, with my notations in red.

Measurements to 1/144 scale...I wonder?

Link: A useful online tool - Scale-model.nl's Scale calculator

Eduard 1/144 Me 109 G-2 - Part 1

Construction phase
Well, there are only 18 parts plus two canopies (why two I don't know, as they appear to be the same type), with some of the parts being optional - like the wing mounted cannons and the fuel drop tank.


Initial construction was very straight forward, particularly as there are no cockpit details to worry about, just a blank cover hiding the interior.


I did find the nose accessories (sorry not sure what they are) a little over-sized and not a terrific fit. In particular, the 'bumps' will need some filler to make them seamlessly blend into the fuselage. There are no wireless ariels, which is probably a good thing at this scale.

There is a noticeable seam join down the middle of the fuselage which I will have to fill.


A bit more filling will have to be done underneath where the wing joins the fuselage. But the major problem with this kit - from my point of view - becomes apparent when you start to put together the underside. Eduard only supply an undercarriage which is designed to be fitted in the down position.


Now this is a problem because I want to mount my model in a flying pose, undercarriage up. However, the parts provided do not fit into the undercarriage 'wells' as they are - some modifications have to be done if you want your Me 109 in the flying state.


In the above photo you can see an unmodified undercarriage group of components next to a wing where I have inserted one of the wheel struts which I already modified by trimming off the landing gear.


Having removed the gear from the struts, so they lay flush in the gear wells, I will have to slim down and cut my wheels so they fit in the wells next to the struts. In the above picture you can see how I am most of the way through doing this to the right undercarriage. I will have to take some more off the thickness off the wheel though, so it appears to be under the strut rather than flush with it.

As I mentioned, I will not be fitting the optional 20mm wing mounted cannon or the drop tank. Instead I will be fitting some sort of flight stand, and I will also be making a piece of circular transparent plastic to represent the rotating propeller. That's what I'll be doing next.

Monday 28 January 2013

Wish list - Fox One 1/144 Finnish Lysander Mk. 1

I intend to have three aircraft in my Rapid Fire! rules inspired Finnish air force. A fighter (Me109), a bomber (JU-88) and a observation aircraft. The rules are slightly different for the recce plane, whereas one fighting aircraft model represents six 'virtual' aircraft in the game the single observer denotes just one plane. Plus that plane must be unarmed.

I checked up to see what reconnaissance aircraft the Finns used during WW2 and as usual they flew anything that was available short of a hot air balloon  But among the specialist military observation planes they used were the British made Westland Lysander Mk. 1, so I went on a search to see if I could find a 1/144 kit for this attractive little single engined plane.

Above: Internet Modeller's Fox One Lysander build review

Well, there is good news and bad news. The good news is that a Japanese company called Fox One does make both a resin kit version of the Finnish Lysander, the bad news is that this is a premium collectors item which costs around £24!

This is a bit of a shock after just paying a mere £4.99 for my 1/144 JU-88 kit. But it would be wonderful to have a Lysander in my Finnish air force, so I am in a bit of a quandary (particularly as pay day is coming up). I have never paid £24 for a kit as yet, and the fact that this price would be for what may be the smallest kit I make has me squirming a bit.

...But look at the photo - she looks so lovely!

The Fox One Finnish Lysander kit is available from Radjapan at a cost of 3,500 Yen (£24)...Should you be as mentally damaged as I obviously am.


Sunday 27 January 2013

Painting an Me109 at 1/144 scale

Tim Gow from the MegBlitz blog pointed out that my looking at larger scale models for inspiration for a 1/144 isn't all that constructive as the differences in scales meas that a completely different treatment is needed. Here's a really nice example of one of Tim's small Me109s...


The basic camo scheme shown is a similar scheme to some of those used by the Finns (RLM 74,75,76, with splinter camouflage pattern on wing/upper surface and mottled pattern on the side).

Luftwaffe paint desciptions:
> RLM 74: Green-gray
> RLM 75: Purple-gray
> RLM 76: Light-blue

Now I'd imagined I would approach my 1/144 kit the same as my 1/72, with spray paint and masking, but as soon as I opened the Eduard kit box this morning I realized that Tim had a very good point about painting techniques and scale.

1/144 is small! Until I got that lid off I hadn't realized just how small.


Trying to apply complicated masks - tape or Blu-Tack - to something this small might not be viable, Tim prefers the good old fashioned brush method!

Edit: I found a really nice - if somewhat over-the-top paint tutorial for Eduards's 1/144 'F' Me 109 over at the ARC Forums. I am NOT going this far - but it's fun to read.

Saturday 26 January 2013

Features work - Jari's Finnish Me109G (1/48)

Once again this is a bit of research for my forthcoming 1/144 Finnish Me109G. This beautiful 1/48 scale model has more detail than you can shake a stick at and as such is over-kill for my tidgey plane project, but it has an excellent scheme...


Above: Jari's Finnish Me109 G-6 as piloted by the ace Nils Edward "Nipa" Katajainen.

Jari has actually done a couple of Finnish Gustavs, a G2 and a G6 version, and either is expertly rendered in a very subtle airbrushed manner which is beyond my blunt spray can daubing!

At the moment I am scratching my head trying to figure out how to achieve that mottled camo. I figure the BlueTac method of masking out areas you don't want sprayed maybe? So the body and wings all over dark grey, the BlueTac mask the mottling, and then carefully spray the light grey up the sides of the body until it blends into the dark grey at the top...

Or something like that. :)

Links to Jari's very well written posts on his two Finnish 109 model builds:

> Me109 G-2: Maj. Eino Luukkanen (56 kills total, 32.5 in this aircraft).
> Me109 G-6: Nils Edward "Nipa" Katajainen (36 kills).

Jari's Modelling Pages

Featured work - S. Bathy's Finnish Me109G


As I am about to start on my 1/144 Finnish Me109G kit I thought I would have a look for some inspiration. I found this beautifully turned out 1/72 example by energetic model maker S. Bathy. He has a fantastic gallery of his enormous collection on Flickr - S. Bathy's Photostream.

Thursday 24 January 2013

Kit post tennis with Megablitz! 1/144 aircraft

This is quite funny - Tim Gow (from the Megablitz Blog) and I are now engaging in blog-post tennis. In response to a post I did here he has replied with a post of his own - Ilmavoimat (Finnish Air Force). So not to be out-done I am featuring his post here!

It's all to do with 1/144 aircraft and using them as the air element of a 1/72 war game army. I recently bought a couple of planes to form the air contingent of my Finnish WW2 army, but Tim has already collected a wonderful array of Finnish types...

Above: Tim Gow's brace of Finnish fighters were made and painted by 'Wg Cdr Luddite'.

As soon as I have finished (no pun intended) my current V3000 truck I shall be having a crack at my Eduard 1/144 scale Me109G in Finnish colours. Inspired by Tim I shall be incorporating the circular transparent prop spinner.

PS...I guess 1/144 isn't technically Braille Scale is it...Or is it? But what the heck. :)

Wednesday 23 January 2013

Cheap Ford-Werke V3000 (Pt.9) - Cargo Pt.1

(Building a Rapid Fire! Finnish Army HQ Part 10)
As this is my HQ Battalion's supply truck I suppose I better start thinking about making some cargo. However, I like the idea that I might be able to keep the troop benches available for a secondary use, so I have been also thinking about how I can manage this.

I decided that if I make a sort of palette - rectangle of card - that would sit on the troop benches and then I could then glue cut down items of cargo onto this as if the cargo bed were full of supplies. I would then be able to lift out the 'palette' when I wanted to use the truck as a troop carier.


In the above photo you can see my motley collection of cargo bits and pieces. There is also my finished cab interior with - roughly - painted driver and seating (I haven't glued the truck cab and flatbed to the chassis yet). The piece of white plasticard is my palette, cut to the shape of the truck's cargo bed.

The extra tyres are the spare rear wheels from the Pegasus American Army truck which I didn't use, I guess spare tyres are a good cargo? I have some ammo boxes and an oil drum (from the trusty Airfix Jeep kit) and some HO/OO railway crates, sacks and barrels.

Could use some more oil drums, may have to visit the local railway model shop at lunchtime. :)

NEXT: Put them all together and paint them!

Tuesday 22 January 2013

Cheap Ford-Werke V3000 (Pt.8) - Windscreens

(Building a Rapid Fire! Finnish Army HQ Part 9)
Another tiny step forward with the installation of my homemade windscreens and the rudamentry painting of the cab interior...


As you may know, this was the first time that I have made clear plastic wind shields for a  model so forgive me if I am a wee bit pleased with myself. Everything went well and the canopy glue worked exactly as advertised, drying crystal clear.

I was surprised when I squeezed this 'special' glue out as it looked just like PVA and smelled just like PVA...Can't say whether it tasted like PVA but I have my suspicions! But it worked and it stuck the plastic bits together fine.

Best of all though - and my biggest worry - the canopy glue did not stain or mark my base coat of paint. Even when I wiped away some excess glue with a wet brush it completely vanished when dry. So perhaps the money was well spent after all.

Obviously trying to photograph transparent plastic is something of a challenge, but I assure you the windows are now there!


An additional bit of plastic was glued in place for the American style split windscreen (which still has to be painted) and I am considering whether to glue on some tiny wipers too.

The split windscreen is an interesting feature and is not present on all model V3000s. The German made versions of this truck seem to only have a single piece glass windscreen. I am guessing, from what scant information I have read, that the split screen was a feature of the American made or commercial models of this truck. In any case the Finnish V3000 photo I am basing my model on does have this split screen.

Next: A light spray of varnish before I start the pin wash and weathering.

Monday 21 January 2013

What next?

Don't really have anything to show today - it will take a few days now to get all my base painting done and the windows installed on my V3000 so I'm just starting to think about what to do next.

I guess I'm a bit trucked out after my V3000, so fancy a change, here are my options...


  • Citroen 45 1.5 ton troop truck for my Finnish HQ (Engineer Company).
  • GAZ AA light truck with 20mm AA gun emplacement for the Finnish HQ.
  • Break from vehicles and start my 'Finnish Air Force' (1/144 Me109G).
  • Complete break from Finnish project and do a 'quick build' (I have a rather nice Pegasus SU-152 in my stash)!


Yeah, I know - the first two involves trucks again...Anyone any preferences? :)

Sunday 20 January 2013

Featured work - Gulumik's Ba-20ZhD Railroad Version

I need a Soviet BA-20 light armoured car for my Finnish armoured car battalion and as far as I can find there is only one model available in 1/72, the Ace Ba-20ZhD Railroad Version. And over at the Gulumik Military Models blog they have a very nice finished version of this...


Now I won't be using the railroad wheels, just the ordinary road tyres but this is a great looking model with some effective weathering and chipping. This is a really useful guide as to how I might handle the weathering for my beat-up Finnish vehicle fleet.

Take a look at the rest of the photos of this cute little armoured car model: Gulumik -Ba-20ZhD Railroad Version 1/72 ACE

Saturday 19 January 2013

Cheap Ford-Werke V3000 (Pt.7) - Base coat

(Building a Rapid Fire! Finnish Army HQ Part 8)
This is more like it, I always feel I am making some real progress when I start to get the paint on. In this case a quick spray with Humbrol's No. 86 Light Olive aerosol, which I think is a reasonable match for the colour on the truck in the reference of the Finnish V3000 I am using.

Base coat applied to my V3000 model

Next I have to paint some of the other base areas like the tyres and I have the cab to interior to paint fully before gluing in the windows. I am playing this one by ear really.

Edit: Looking at this in the cold light of day I should add that this looks a little lighter than the olive green actually is due to the harsh flash on my camera (it's actually a shade darker).

Friday 18 January 2013

Building a Rapid Fire! Finnish Army HQ Part 7

Supply truck conversion - cheap Ford-Werke V3000 (Pt.6) - Windscreens
Well, this is the bit I haven't been looking forward to - making the clear plastic windscreens for my truck. This is the first time I have done this, though apparently I will have to get used to it as even some premium models - like my recently purchased Wespe kits - don't come with fitted window parts, just small sheets of transparent plastic. So, how to accurately cut out my windscreens?

In short I did the sensible thing - I asked more experienced modellers how to do it. I posted a question up on the Airfix Tribute Forum and quickly got several suggestion which solved quandary. The procedure goes like this...

First of all you cut some small strips of masking tape and stick them onto the inside of your vehicles windows...


Then you use a fine pen to trace the shape of the window onto the masking tape...


Remove the tracings and stick them onto the back of your transparent plastic sheets...


You can cut out your windows - I cut outside the line to make my windows a tiny bit bigger than the tracing. I then dry fitted the windows, sanding the edges down until they fitted...


Windscreens ready! However I don't glue them in yet, another couple of tips from the Airfix Tribute Forum were the suggestions that I should only glue the windows in after I had sprayed the base coat of paint on my vehicle and that I should use a special clear glue.

The glue I was recommended to use was a special 'canopy glue', intended specifically for plastic model canopies and windscreens. This glue is something akin to that white woodworking PVA glue you buy for DIY, and it dries completely clear and does not melt the plastic that you are gluing (it also should not - I am told - melt your paintwork).

(There are several makes of this sort of glue, I bought the Pacer Formula '560' canopy glue. Though there is some opinion out there that seems to think that canopy glue is actually nothing more than ordinary PVA‽)

SO...We shall see, once I have sprayed my base layer on my truck I shall install my finished windscreens. Fingers crossed.

Thursday 17 January 2013

Featured work - Tim's Retro Toy Soldiers

Tim Gow - from over at the MegaBlitz Blog - has posted up an item that has made me realize that painting military models doesn't have to be all about 'rivet counting' or coming up with an amazing new way to render realsistic looking rust - he has painted some fantastic retro-style Cossack toy soldiers...

Tim Gow's restro style toy Cossack cavalry soldiers

If you are my age you may remember with much fondness no doubt the painted soldiers made by the Britains company of the UK, these followed in the fine tradition of hand painted toy soldiers which stemmed from Victorian times. I had a small collection of these myself (British Grenadiers) and always aspired to have a big army, sadly this never happened.

(One of my inspirations was the film 'Young WInston' [1972] in the scene where Churchill as a boy marshalled a large collection of toy British colonial troops in his bedroom.)

Tim's painting style mimics this antique method of painting soldiers down to the gloss finish and look authentically Victorian in their turn out. These figures seem to be for a historical-fantasy game based on a 'Ruratania' type fictional European conflict from the turn of the 20th century (apologies if I have got that wrong Tim), but they look splendidly authentic all the same.

I am very tempted to have a go at this style myself - if I can come up with a suitable theme (I am a Steampunk fan so have a couple of ideas).

Tim Gow's MegaBlitz Blog: Quick Steppe

Wednesday 16 January 2013

Building a Rapid Fire! Finnish Army HQ - Part 6

Supply truck conversion - cheap Ford-Werke V3000 (Pt.5)
Moving onto the chassis. This was perhaps the biggest bit of work because the Pegasus American Army Truck model is a long 6x6 (triple axel) truck - based on the GMC CCKW-352 - while the Ford V3000 is a medium length 2x4 (double axel) chassis.

As you can see from the following photo I had to cut the Pegasus chassis up quite a bit. Part of this was so it would fit into a space I made in the resin Valiant cab and part was because the GMC was a lot taller than the Ford V3000 so there was some trimming of the chassis thickness so it now sits lower.

Above: On the left is the original Pegasus American Army Truck chassis and
on the right is my cut-down version. In the middle you can see the work I have
done on the bottom of the cab and cargo bed.

Another modification was the removal of both the GMC's fuel tank and spare wheel so I could refit them on opposite sides of the chassis. I will also have to make a basic frame on which the chassis will sit, joining it to the cab/cargo bed.

Finally, I had to cut the chassis into two in order to shorten the length a little and to allow me to re-centre the new single rear axel on the cargo bed.


The last part of the chassis conversion is to rebuild my chopped up frame. This will provide the little space I need between the top of the rear wheels...


At this point I decided less was more. Having checked over a great many original photos of wartime V3000s I found that a great many of the commercial Ford based models were bereft of the chassis furniture that the military versions were equipped with. Things like extra 'Jerry can' fuel cages and tool boxes and even the rear mud guards were missing on a lot of the well used trucks. So I stopped here...


The last part of construction will be the cab - adding the windscreens and tidying up some of the joins, etc. I have been putting off the construction of the clear plastic windscreens as I haven't done this before, but I got a good tip for making these over at the Airfix Tribute Forum.

NEXT: THE LAST (CONSTRUCTION) LEG - FINISHING THE CAB.

Tuesday 15 January 2013

Wespe Models Opel Kapitan & Citroen 45

The postman has just just dropped off a parcel from Romania. Sadly it isn't a dragon egg, but happily it's a couple of Wespe resin models. They are a Opel Kapitan staff car and Citroen 45 3 ton truck.


These are wonderfully done resin models in 1/72 scale, but they aren't like any of the budget war gaming resin models I have bought so far. These are premium display quality moulds with a huge amount of fine detail.

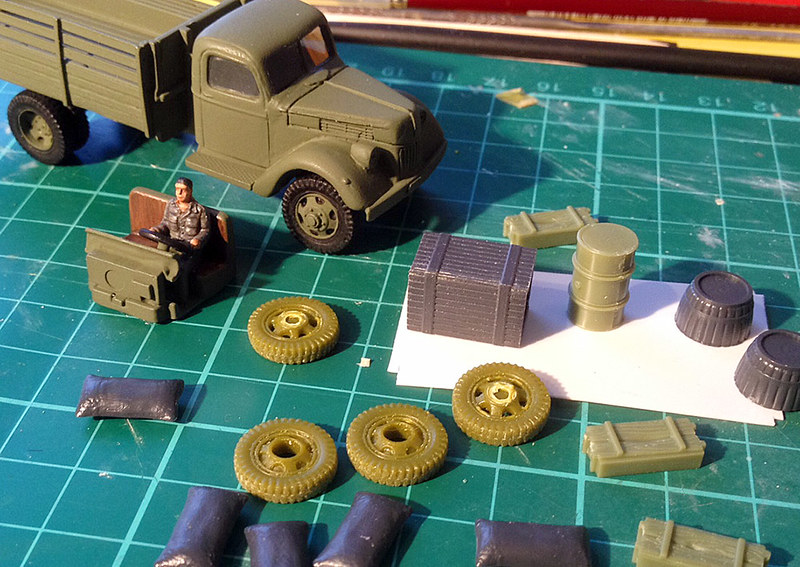
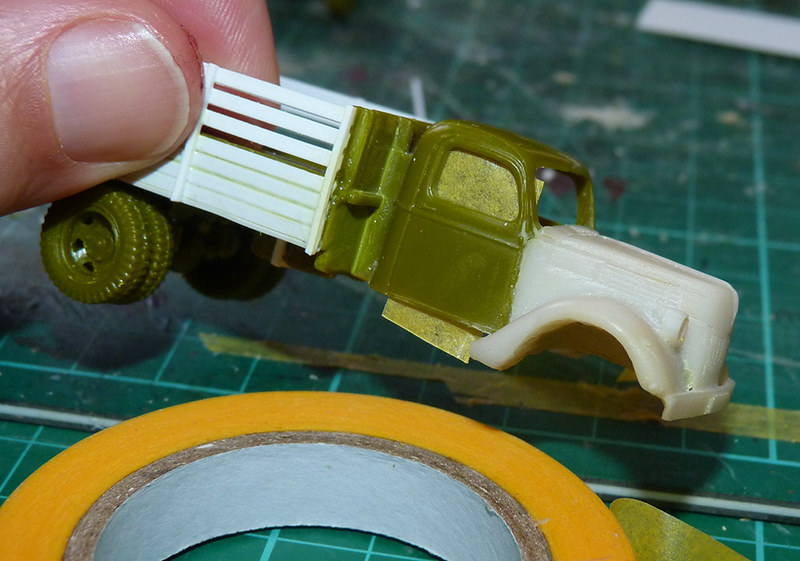
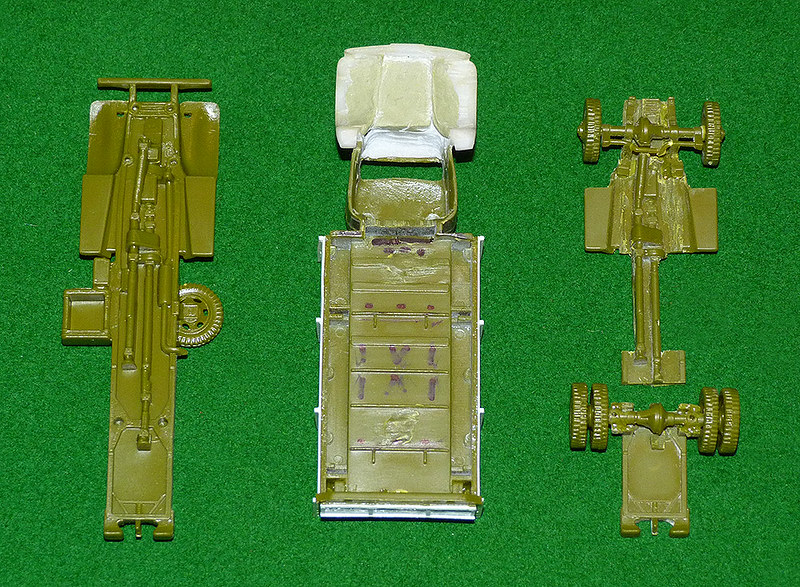
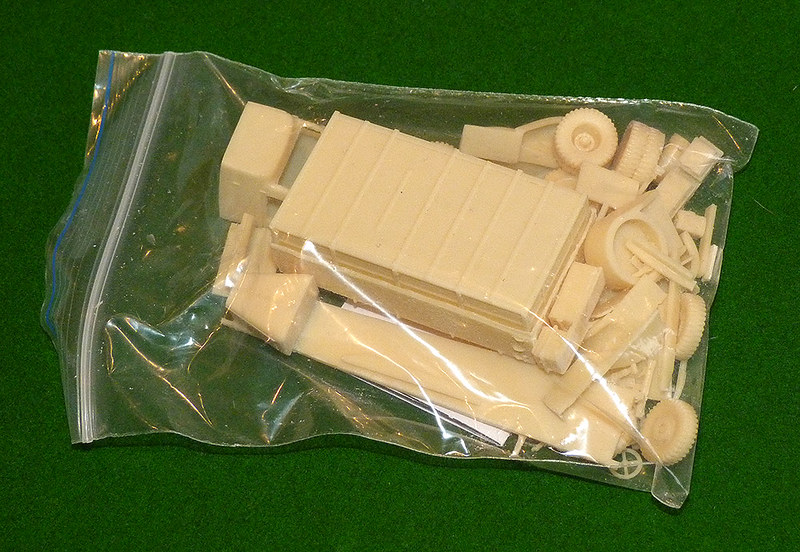
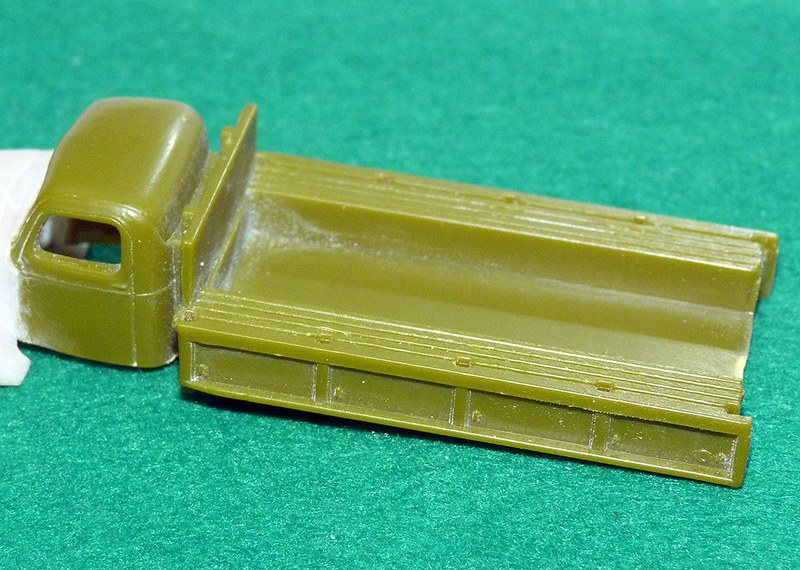
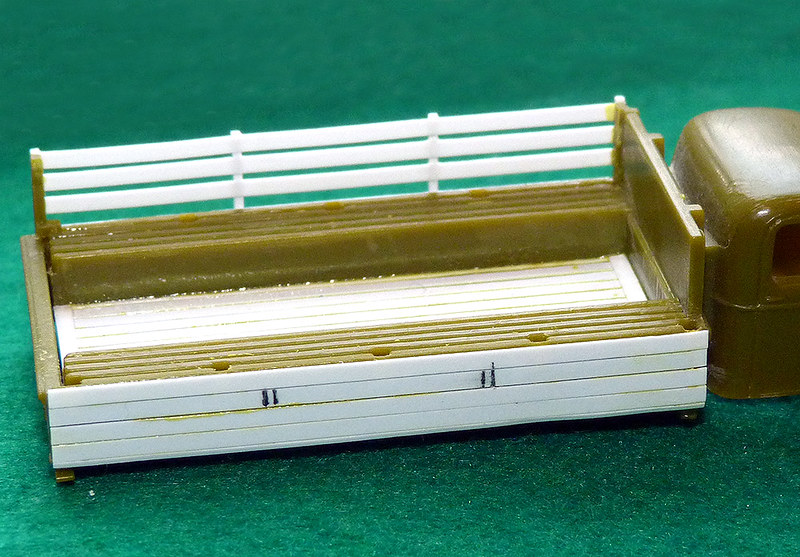
Above: Inside the box, protected by a layer of bubble-wrap, is a bag of
components - a lot of components! Here are the parts for the Citroen 45,
nothing like any of the resin models I have had so far.


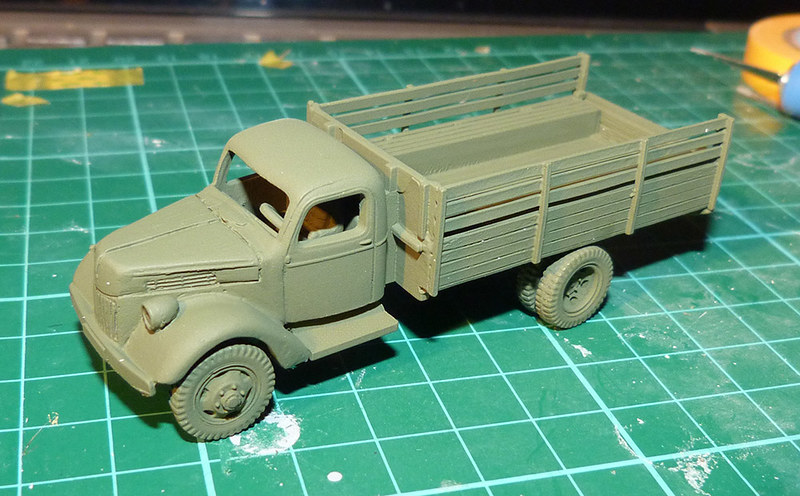
These models were bought for my Finnish army HQ Battalion and represent my commanders staff car and my Engineer Company's truck. Finland received a large quantity of Citroen 45 trucks from their German allies (OK, we have all made bad friend choices at one time!) and the Opel will be converted into the similar looking 1940 4-door Sedan as the Finns made use of a large number of American cars of the pre and early war period (mainly Plymouth and Fords).

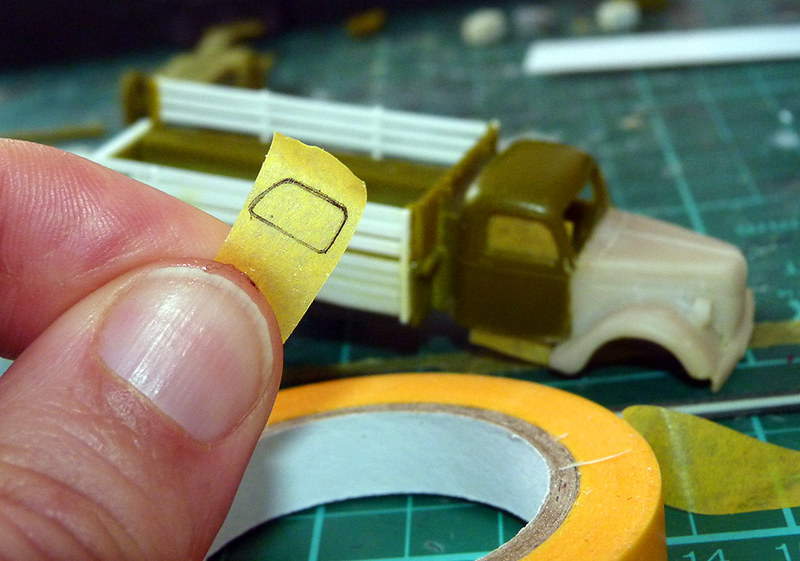
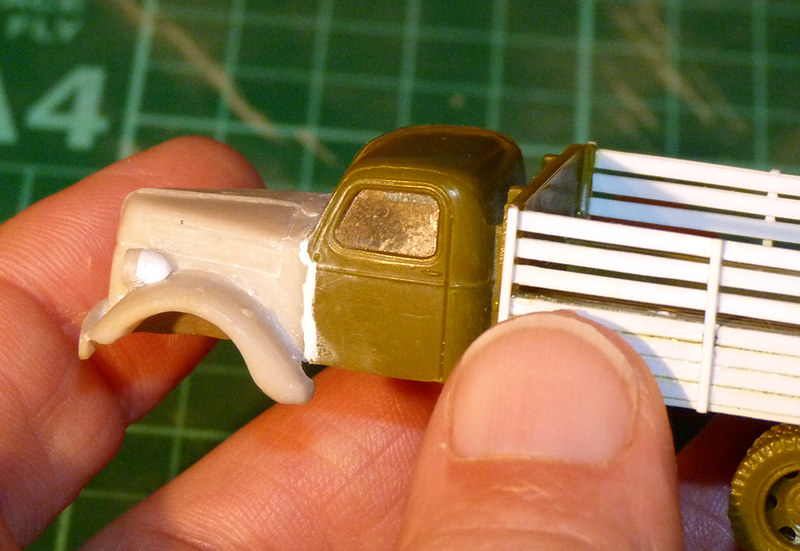
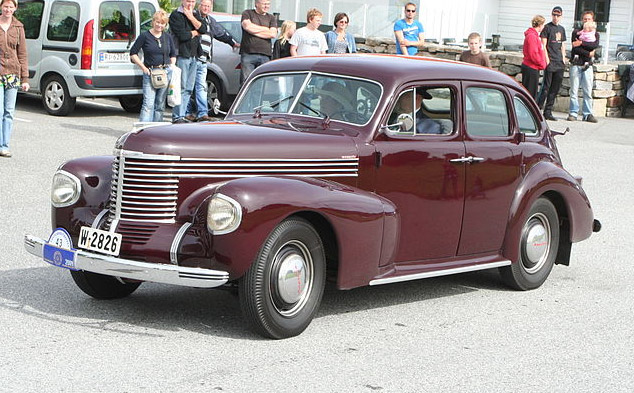
Above: The lovely 1940 Ford Sedan, suspiciously similar in design to the German
1939 Opel Kapitan. Handy for me as it means just some minor cosmetic
modifications to my Wespe model to turn it into this American classic car.


1939 Opel Kapitan. Photo source: Wikipedia
Above: The 1939 Opel Kapitan. Photo source: Wikipedia

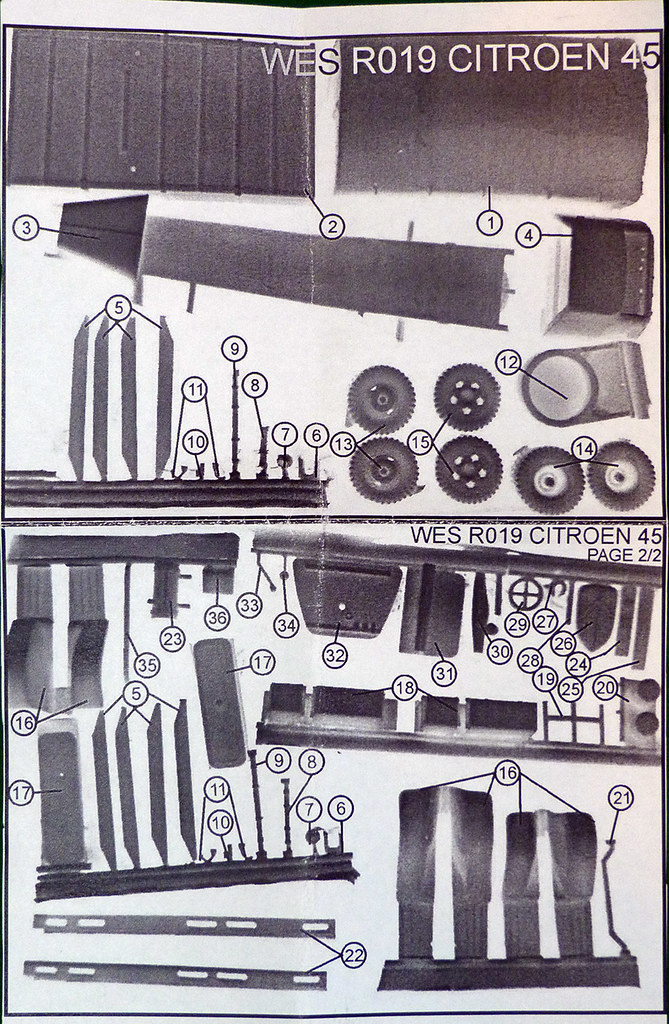
A quick look through the boxes and their contents is enough to impress me. There are a large number of finely made components in each box along with a photocopied inventory of parts and a sheet of 'instructions' (just a diagram of the orientation of parts really).

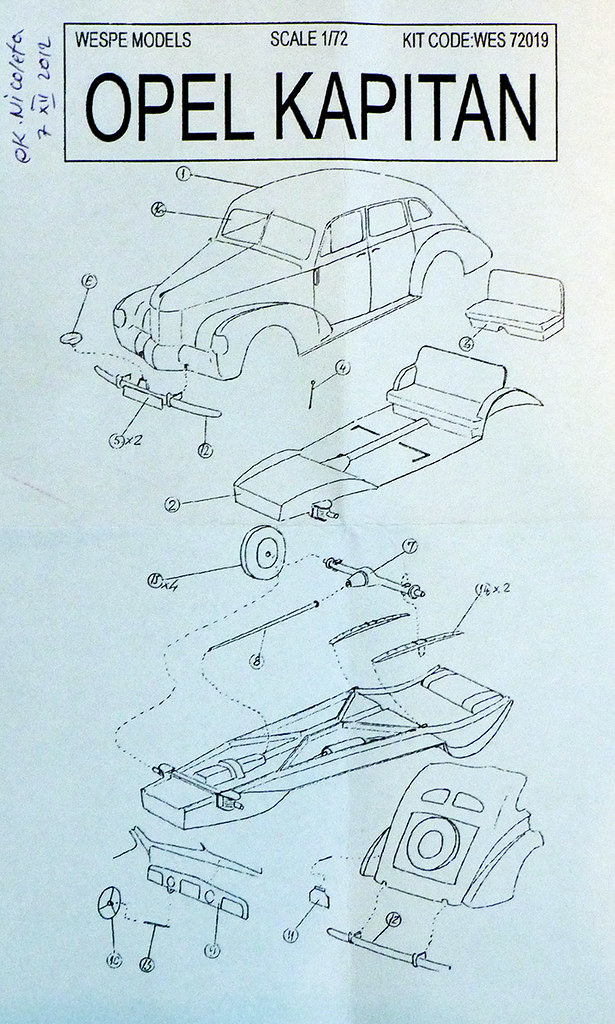
One thing I liked was that each instruction sheet was hand signed by a Wespe staff member to show that the kit contents had been checked before dispatch.


I can't see any downsides, other than perhaps hat there are no colour scheme suggestions except the one that's on the box, decals of windscreens cut to size (you get a rectangular sheet of transparent plastic instead). But I guess, if like me, you want to buy these niche vehicles you have a pretty good idea about how you want to paint them. Though I guess war-gamers might wince at the price of these models (I did try the SHQ Citroen 45, but this white metal model was so bad that I immediately assigned it to my scrap box).

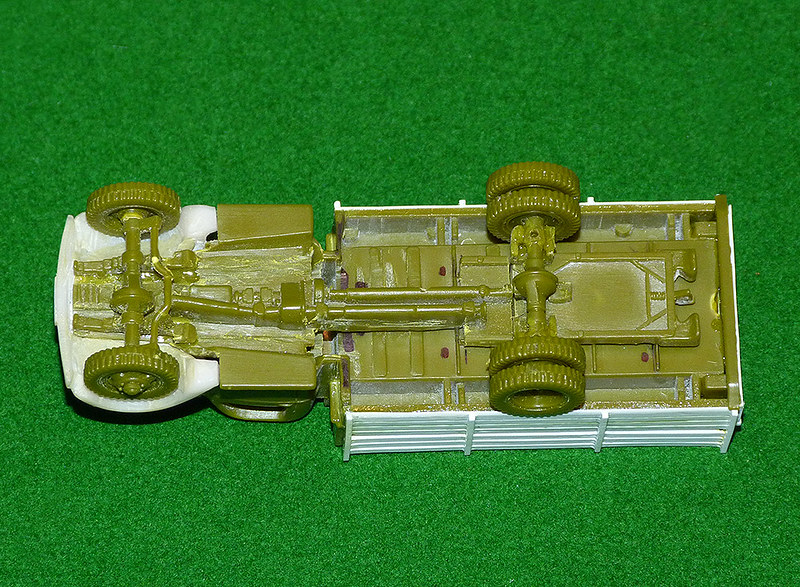
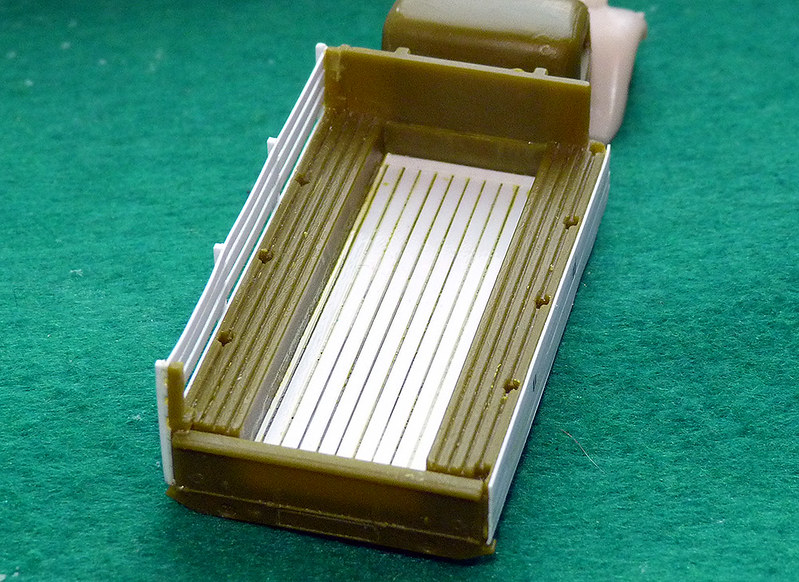
Above: Each kit comes with an inventory sheet, this being the sheet for the
Citroen. As you can see, some of the parts are quite delicate but there is
an welcome absence of flash.


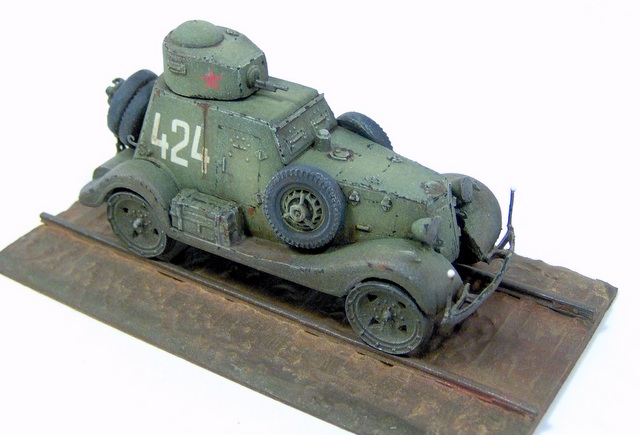
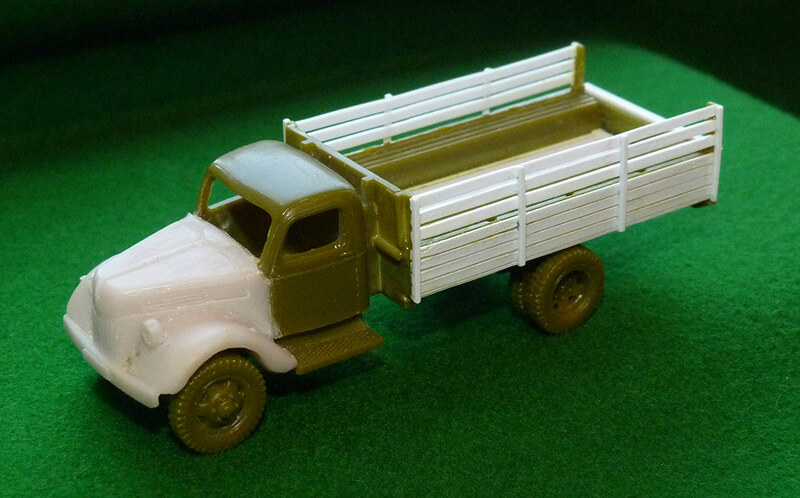
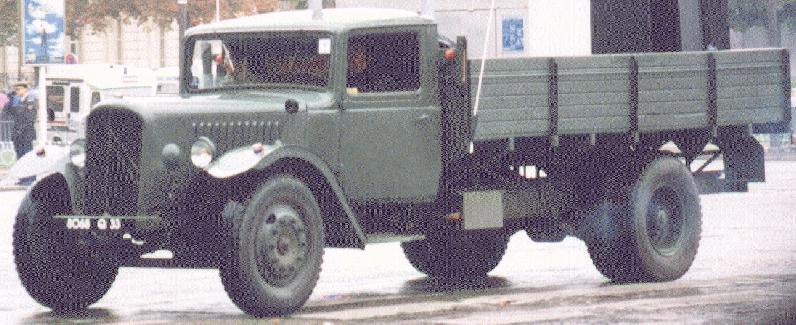
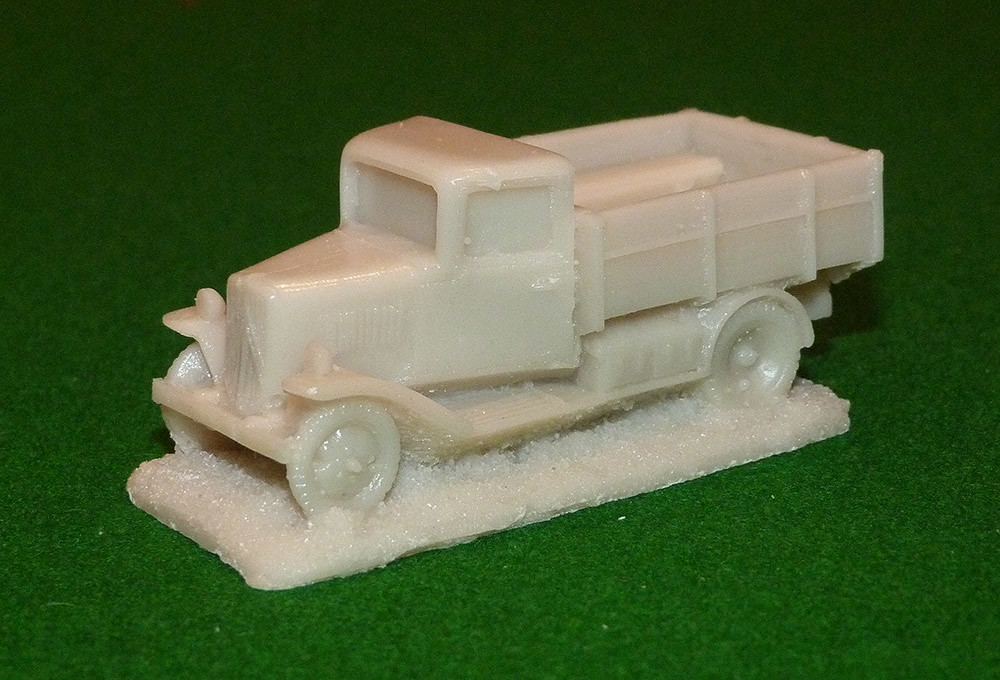
Interestingly the Citroen 45 has quite a wide variety of possible uses, from 1940 French army to North African Vichy or French colonial and also Wehrmacht (for which an estimated 15,000 vehicles were produced during the occupation), captured Soviet as well as Finnish.

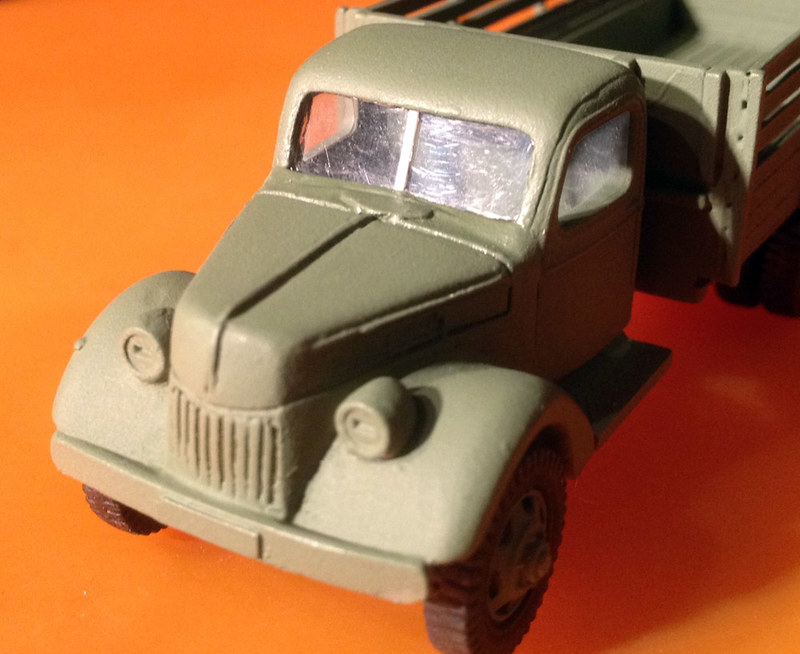
Above: The Citroen 45 3 ton truck. Photo source: Denis Orlov, Moscow.

The delivery time to the UK from Romania took two weeks, but that was during the Christmas period, and I was supplied a tracking code by Wespe. So overall I am very pleased with this purchase

Monday 14 January 2013

Featured work - Chris Steadman's 1941 Chevy truck

Being into trucks at the moment I was delighted to find this wonderful model of a early war Chevorolet truck. This seem to be a US lend-lease export for the Soviet theatre, but the Chevy stake trucks were also exported commercially during the immediate war period to countries like Finland.

Chris has done a great job with this 20mm resin war game model from Dave Reasoner's Moonlite Modelwerks range. I particularly like the weathering and the slightly rusty/muddy cargo bed...

Moonlite Modelwerks 1941 Chevrolet stake truck
Above: One of three photos of this nicely done model from over at The Society
of Gentleman Gamers forum. Source link.

Unfortunately I can't find out much about Moonlite Modelworks, they don't appear to have a web site and the only way to get their stuff is by emailing them directly for a catalogue. But I am going to give this a go as this Chevy is a beauty and depending on the price may be another potencial victim of my 'cut'n'shut' technique (poor thing)!

Once again I am left cursing myself for not planning my Finnish army in 20mm instead of 1/72 - this would have made a terrific addition (and I am so god damn pernickerty that I can't stand to mix scales and ready to roll models with plastic kits)!

If you would like a copy of Dave Reasoner's Moonlite Modelwerkes catalogue you can email him at this address: EMAIL MOONLITE

Also, you can view some more of Moonlite's models on this post by Peabody over at the 'Peabody Here!' blog: Radio! Radio!...

Sunday 13 January 2013

Building a Rapid Fire! Finnish Army HQ - Part 5

Supply truck conversion - cheap Ford-Werke V3000 (Pt.4)
I said that I was going to finish off the cab conversion next...I lied! I love working with plasticard and couldn't resist building the new truck flatbed instead.

Basically the Pegasus US Army Truck model has a completely different flatbed arrangement than the Ford V3000. It's slightly longer, has a different design for the sides of the cargo bed and doesn't have the additional wooden side-planks that are indicative of a 'stake truck' design.

The original Pegasus American Army Truck cargo bed before conversion

Luckily it's a very simple build to convert the GMC type truck to a stake truck type, I simply sanded down the original flat-bed side detail so the sides were flat and then added four plasticard strips on each side. I next added the four vertical side supports and then added three wider spaced strips at the top for the stake sides.

Converting the Pegasus American ARmy Truck into a mock Ford V3000
Above: One side of the stake truck design complete, here you can see
my mark up for the next side.

The stake truck feature seem to be mostly a design that is indicative of commercial trucks of the time. Pre-war designs by Ford, Chevrolet, Dodge, etc were pressed into military service by the Finns and these seemed to be identifiable from specialist military trucks because of their lack of 'tilt covers' (canvas covered cargo beds).

My stake truck build is - like everything in this build - a bit of a fudge, but bears a passable resemblance to the real thing hopefully. As said one of the main differences is the length of the GMC cargo bed and also the inclusion in the Pegasus kit of troop benches on either side of the cargo area. I thought about cutting these out as my truck is supposed to be a cargo truck and not a troop carrier, but these benches are integral to the design of the GMC kit design and would result in my having to completely rebuilding the sides of the flat bed.


Above: Here you can see the original Pegasus troop benches (with holes for the
original side struts). I decided to leave these but I added some floor planking and
am using the original tail gate (but may add plank cladding to this).

Finally, to give a bit of character to the flat bed floor, I added some plastic strips to resemble floor planking. Easy. To roughen up all of the plasticard strips used in order to give them a 'wood' texture I coated them all with some thin coats of liquid poly cement, this slightly melted the surface plastic to give it a mottled effect.

Turning my Pegasus army truck model into a Ford V3000 design

Friday 11 January 2013

Down memory lane - Brian Sherriff's shop from the 1960s.

Making models is one of those 'bloke hobbies' that takes you back to when you were just a nipper. I am no different and I willingly admit that my taking up of scale plastic model making is probably some sort of mid-life crisis thing, it does bring back some very fond memories.

Well, I just happened to be doing some Friday afternoon surfing and I stumbled across a photo of the very first toy shop that I ever knew - it's Brian Sherriff's shop on Victoria Road, Dundee...

Photo source: Retro Dundee blog

One of my earliest memories of the early 1960s was standing outside these windows with my Dad, both of us staring longingly at the hoard of goodies contained inside. I was mesmerised by the Corgi and Dinky military vehicles and my Dad loved HO/OO railways.

Sherriff's later moved to the Cowgate in Dundee and had some great success for a time marketing it's own range of paper/card model rail-side building sheets. They also claimed to have the biggest working N Gauge layout display in Scotland.

I remember buying my very first Airfix kit from this store - the obligatory 1/72 Spitfire in the old style plastic bags. But later I bought Matchbox and Airfix military vehicles to populate a table-top 'battlefield' that my Dad built me. The two kits I can distinctly making myself - my Dad took over, as Dad's do, most of the time - were the Airfix US M3A1 Half Track and later the 1974 Matchbox Humber Mk. II (though I was probably starting to grow out of kits by this time).

The earliest kit I can remember making was Frog's Vultee Vengeance Mk. II in 1/72.

Even today, when I visit the old home town I cast a nostalgic eye at the place where Brian Sherriff's used to be.

Wednesday 9 January 2013

Building a Rapid Fire! Finnish Army HQ - Part 4

Supply truck conversion - cheap Ford-Werke V3000 (Pt.3)
Just a little update so I can convince myself that I am making some headway with this model. Short story, as usual my idea that this would be 'quick and easy' was way off the mark as the chassis of the Pegasus GMC needs lots of shaping to fit the V3000 cab...


The 'GMC' American truck sits quite high on it's chassis and has a suspension that has to be modified so my mock V3000 looks realistic. So it hasn't been the straight forward conversion I imagined - when are they ever?

Still, I'm slowly getting there as you can see, the next stage is to fit out the cab with a dashboard, steering wheel, seats and driver (all from the Pegasus American Truck kit). These will all have to be painted before fixing permanently inside and - perhaps hardest of all - I will have to make some windscreens out of some spare clear plastic. Never done this before.

Featured work - Tim Gow's Pegasus BA-6s

Over at the Megablitz blog Tim has posted up a couple of nicely done 1/72 Pegasus BA-6 Soviet armoured cars...


I'm very interested in these particular models as I intend to add a pair of these to my Finnish army project. Finland captured a plethora of Soviet armoured cars and apparently put them to good use. They knew the BA-6 as the BAF B, they used about 10 of the dozens they captured and also had the later BA-10 (BAF C) heavy armoured car.

Useful reference: Jaeger Platoon Net - Finnish Army 1918-1945

Nip over to Megablitz and take a gander.

Tuesday 8 January 2013

Valiant resin ready-to-roll models

I was very pleased with the Valiant V3000 resin model I received over Christmas and so I ordered a couple more to play about with. I bought the Fiat 626 truck and the Citroen light truck...


As with the V3000 one-piece resin model I intend to chop these models up in order to combine them with some plastic kits so that they fit in with my current project. While it does seem a shame to hack up these lovely models they do offer me a relatively cheap way to make some hard to get hold of vehicles that I need for my Finnish army.

If I make another war game army I would be very happy to use these Valiant ready-to-roll models, they are not only nice looking but they are an easy way to put together a fleet of vehicles quickly.

I particularly like the Fiat 626, it's a pretty hefty block of resin! The detail is really nice considering it's a one-piece moulding...


This will be the basis of my Volvo B12 radio truck build...Hopefully. I will use the cab of the Fiat and build the chassis and back of the bus from plasticard. The Citroen is not quite as nicely done as the Fiat but still isn't bad for just £5.95...


In this case I simply want to add the bonnet to a cheap plastic kit of the Soviet Gaz 5 to add a bit of variety to my Finnish army vehicle fleet. Again, it might seem a bit of a waste but what can I say...I like to tinker!

As with the V3000 I bought these from the Rapid Fire! UK store, but they were marked as being from Valiant Miniatures.

Monday 7 January 2013

Finnish air force on it's way!

This is a bit of an ice-breaking diversion as I struggle to get back into modelling again. I bought a couple of really cheap and simple 1/144 aircraft just to get used to putting paint to plastic once again.


However, they are connected with my big Finnish Army project as the Me109G and JU88 were both used by the Finnish Air Force (very successfully) during the later part of World War 2. In fact I was quite stunned to find out just how skilled the Finnish fighter pilots were as they scored a huge number of kills compared to their losses...

"The Finnish Air Force achieved 663 victories with the Messerschmitt Bf 109Gs during 1943 and 1944, while losing 32 fighters in combat or to anti-aircraft fire.16 aircraft were lost in accidents and 8 were destroyed on ground. 23 pilots were lost - an impressive exchange ratio of 25 : 1." [kurfurst.org - Finnish Air Force Performance Trials on Messerschmitt Bf 109 G-2, WNr. 14 783 'MT-215']

The models I picked up were the Minicraft Ju88 and the Eduard Me109G. I chose 1/144 over 1/72 for two reasons, first - as I said - I just want a quick and easy project to do but also I wanted to 'scale' my air component of my Rapid Fire! army. What I mean is that if one imagines a 1/72 army on a table top, then imagines the scale height that an aircraft would be flying over your table I guess it would look more 1/144 than 1/72! This is just my dodgy theory - a lot of war gamers simply seem to use 1/72 planes if they are using 1/72 figures.

Anyway, I'm quite excited as these will make a nice change from vehicles.


Edit: Wow! I don't feel so stupid about my 1/144 scale planes theory now as I just found this post over on the Megablitz blog that expresses the same idea..1/144 scale aircraft - Messerschmitt Bf 109