Thursday 31 July 2014

On holiday for two weeks!

Well, it's summer vacation time! So I will not be updating the blog for a couple of weeks - instead I shall be soaking up the sun in Italy.

I thought I would leave you with this minor update of my Pegasus German Army Truck project. I've been working on the second of the two trucks from the kit, this time I thought I'd try out a new type of camo scheme - which I call 'grey squiggles'! (I'm sure the Germans had a better and more marshall sounding name for it.)


I'm masking out the camo scheme using BluTack pieces. My airbrush isn't good enough to paint on the camo 'squiggles' freehand, so I am having to resort to masking instead. Pity - I could have probably have done it freehand on a 1/35 scale model but not at this smaller scale.

The idea is that I mask out this light grey coat using the blutack pieces and then spray the darker German Tank Grey coat over the top of everything. Hopefully when I remove the blutack I will be left with light grey 'squiggles'. In theory! :)

Hope you all have a enjoyable couple of weeks, I look forward to reading up everyone else's blog posts when I return. Bye for now.

Steve

Monday 28 July 2014

Scotia Grendel 1/300 LAGG-3 - Part 3

Funnily enough this is the part of the project I haven't been looking forward to - applying the decals.


I suppose it should be one of the easier parts of the job - maybe - but I find the Finnish emblems quite tricky to apply so they look 'straight'. The Finnish hakenkreuz never seems to line up properly (for me anyway), and no sooner do I get one of the 'arms' of the swastika lining up with one part of the wing or whatever than it you notice it looks out of line with another part.

The painting was very enjoyable. Though one of the foibles of working with a white metal models seems to be that there is no such thing as a smooth flat surface!

No matter how hard you try to paint a straight line the imperceptibly undulating metal surface causes your line to look 'wobbly'! In the end you learn to compensate by painting counter wobbly lines, which seems to even things up nicely.


I'm also pleased with the olive green colour - which is Revell's 361 Olive Green - as it isn't as flat as some of Vellejo's olive greens. It's nice and rich.

The windows turned out OK, I went for the simple option and just outlined a Vellejo's (961) Sky Blue with some plain white. I didn't even bother blending the white in for a gradiated look.

Finally, I hate yellow! I've been using Valleho's (953) Flat Yellow but it's a horrible consistency and takes a few thin layers to build up a decent rich yellow. I found myself continually going back and touching up parts of the yellow theatre panels. Worst bit of the job.

Hey ho. Nearly there - and as I said, on the whole it's been a really nice relaxing little diversion. Next I have to decide if I am adding a transparent plastic 'propeller' disc and attach the stand.

Sunday 27 July 2014

ModellTrans Modellbau Ford V3000 conversion kit - Part 2

Picking up where we left off, I've started to rebuild my cab so that the resin
cab sits securely onto the Italeri chassis. As it is there are no guide or pilot
holes or tabs to help this, so I've made some supports myself.
OK chaps, this project is turning out to be a tricky one in so many ways. First of all I have to backtrack a bit and admit I made a boo-boo - the 'problem' I highlighted with the ModellTrans cab not fitting on the Italeri chassis turned out to be 50% my fault. I just hadn't done my research well enough.

I had said that the mudguards (fenders to our American buddies) sat way too high above the front wheels and so I had to lower the cab to get them to fit right. Well, yes I was kinda right IF the ModellTrans V3000 kit had been an early type V3000 with the large rounded mud-guards...Only, it's not!

Another little job was the addition of a suitable driver figure. The space in
the cab is very cramped and the steering-wheel (from the Italeri kit) makes
the task all that more difficult. But I cobbled together a figure that fits.
The ModellTrans conversion kit cab is based on the slightly later V3000 with the simplified fenders. These were less rounded - to save metal and speed production I guess - and did indeed sit way higher above the wheels that did the earlier versions fenders. Drat.

A German Ford-Werkes V3000S model.
The reason for this is - I suspect - that the larger rounded wheel-arches are a characteristic of the original Ford design, and of early German Ford-Werkes production models. But this design was simplified by the Germans about 1940, incorporating the simplified mud-guards.

As you can see from the above photo the wheel-arches are, indeed, quite high above the wheels (as with the ModellTrans model). It is not a mistake, even if it does look a little strange.

Unfortunately this causes me a little problem. Finland did not use the German production model of the V3000, much less this simplified model, but rather they used the American production model with the rounded fenders. Double drat!

Left: A very nice example of an American production Ford V3000. You can tell it's a US model because of the split windscreen. The Germans used a single piece windscreen.*

So, my friends, it would be wrong to use the ModellTrans conversion if you want to make a model of a V3000 in Finnish use! (Incidentally the Germans used both early and late models with both types of mud-guards. But the V3000s in Allied use - American, British, Australian, etc - did not have the simplified mud-guards. So it's a good way to tell them apart.)

So, I will have to modify my V3000's mud-guard's shape using Milliput to make it more rounded.


This won't be a hard job but will have to wait until I've finished painting the inside of the cab (before gluing it permanently in place) and base coating the completed chassis. I decided that it was more practical to base coat the chassis before fitting the cargo flatbed onto the intricate supports provided.

Here's a shot that shows the flatbed supports that come with the Italeri Opel
Blitz kit. Painting the chassis before attaching the flatbed means you can
paint the spare wheel properly, an impossible job with the flatbed in place.
I really wish some additional historical information had come with the ModellTrans kit (there aren't even any instructions included). I suppose if I had done my research thoroughly before starting I might have avoided my mistake regarding the wheel-arches. But there you go.

Generally, everything is starting to come together and I'm even glad I did do the additional surgery on the cab seats as the cab now sits more securely on the chassis because of this.

Next: Base coats and the flatbed.

* An interesting and amusing fact. The photo of the American production Model is courtesy of '9th Reenactment Society' web site. Just to prove that the issue regarding the confusion between V3000 production types isn't just a problem for modellers they have used this American V3000 and repainted it in German colours. They mention in their text on their site that the variants are 'identical', but of course they weren't. They neglected the fact that only the American production models had the split screen! Of course, they could argue that their example was one of the many V3000s captured from the Dutch in May 1940, as the Dutch models were based on the American design. Confusing? 

Friday 25 July 2014

ModellTrans Modellbau Ford V3000 conversion kit - Part 1


This will be the third Ford V3000S V8 truck that I will have made for my Finnish Army project. The reason for this is that the V3000 truck was somewhat synonymous with the Finns struggle during WW2, it was one of their most numerous military transports and gained such a reputation that it even had it's own nickname of "Hävittäjä" ('fighter').

Source: SA KUVA No. 69976
Now I won't go into the history of this vehicle and why it ended up such an important vehicle to the Finns as I've done that twice already, suffice to say that it's prominence has encouraged me to seek out the best model I could find.

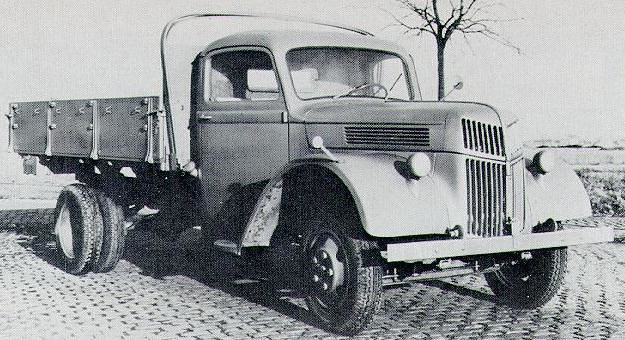
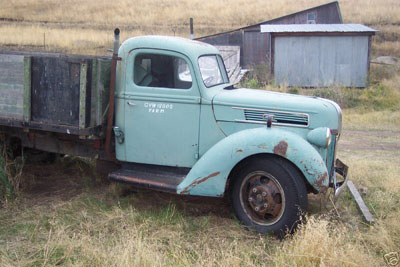
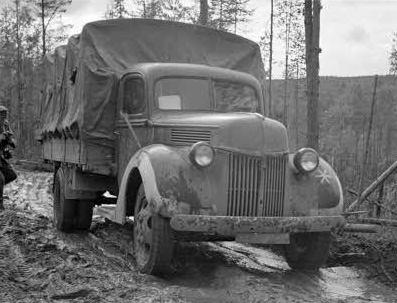
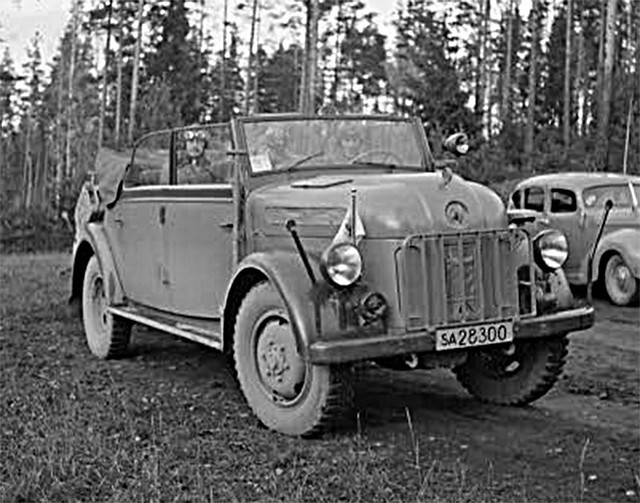
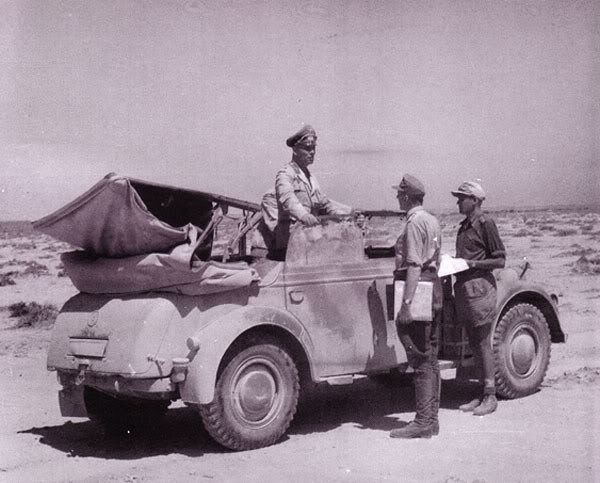
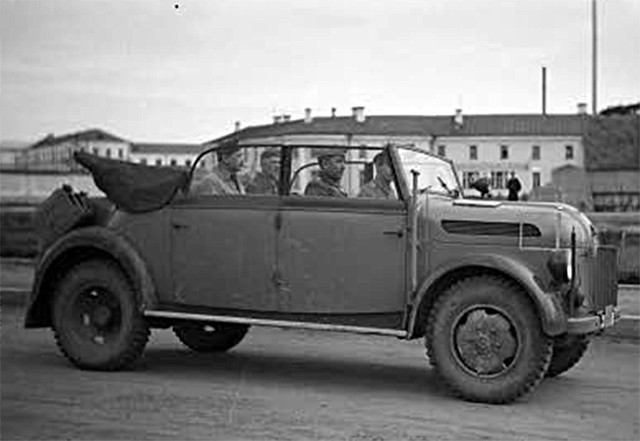
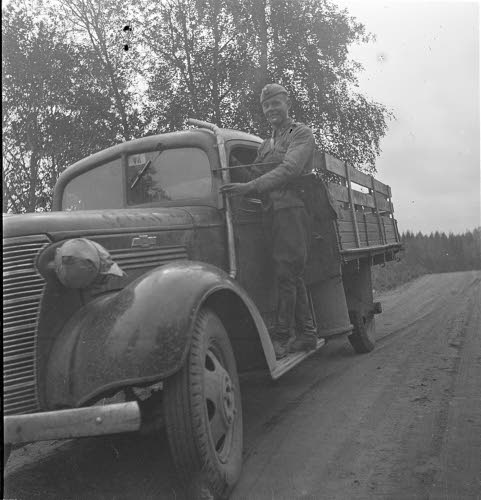
Left: A very interesting contemporary photo of a Ford V3000S in use in Finland in 1942. What's so interesting is that this isn't a Finnish Army example but is in use by the Wehrmacht. Although the German Army used the V3000 - produced by Ford-Werke factories in Cologne and Berlin - they also pinched a shipment of American Ford V3000s intended for the Finns, and this appears to be one of them. You can tell it's an American V3000 instead of one of the German ones because of the split windscreen (the German ones has a single piece windscreen). Er, so I gave you some history anyway! Sorry.

My search for an accurate 1/72 kit of the Ford V3000S led me to two candidates, and expensive short-run resin kit by Hunor of Hungry and a cheaper resin conversion kit by ModellTrans Modellbau of Germany. 

The ModellTrans conversion - the easy option?
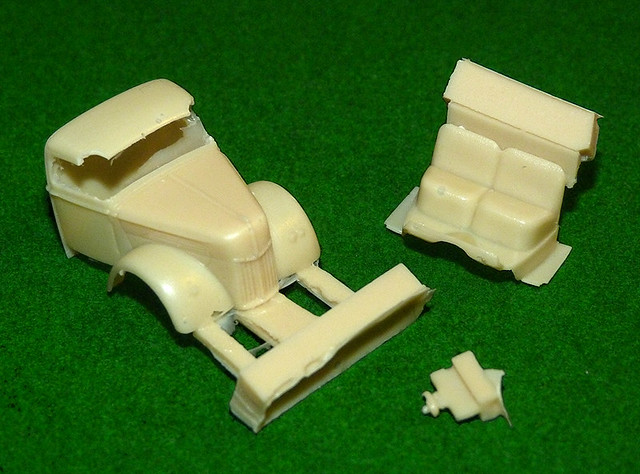
In the end I took what I thought would be the easy - and cheaper - option and bought the conversion kit which was designed (in theory) to be combined with the Italeri/ESCI Opel Blitz kit to make a reasonable V3000 model. 

Unfortunately when the kit arrived - from the Czech Republic - I found that the cab was damaged and that both the windshield pillars were broken and missing. I guess I should have sent it back but who knows who was to blame, so I decided to see if I could fix it myself.

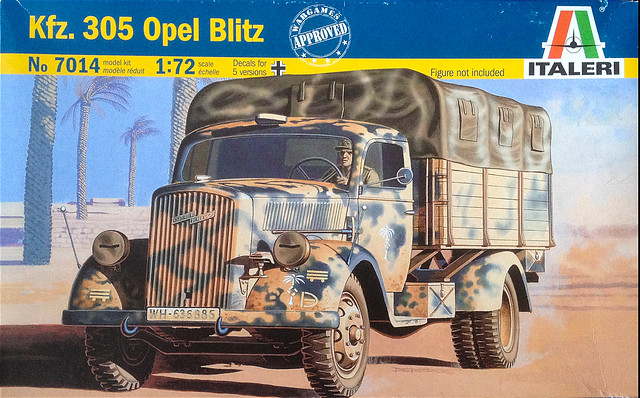
The incentive I needed to actually mend this kit came when I finally came across the Italeri kit which would supply the recommended donor chassis. This Italeri kit is actually an old one and was originally made by ESCI, as such it's not one of the best best Opel Blitz models anyway - but the one I found was very cheap.


Construction
The construction is quite straight forward really, I started by building the Italeri Blitz chassis. It's a simple kit with a limited number of parts (it's marketed for wargaming). I did have a few little niggling problems with the parts, however, and I certainly think you could do better if you actually do want a Opel Blitz in 1/72. The suspension is suspect and the tyres and badly moulded with exaggerated tread and injection marks on the outside which destroys some of the detail. 

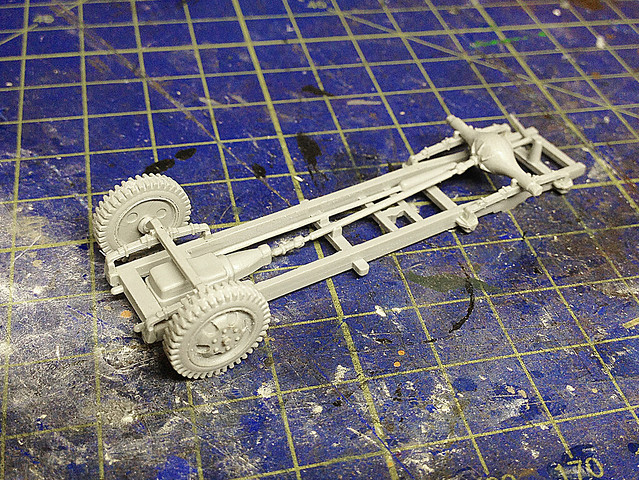
The Italeri chassis, simple but suspect (the rear axle seems to sit too high).
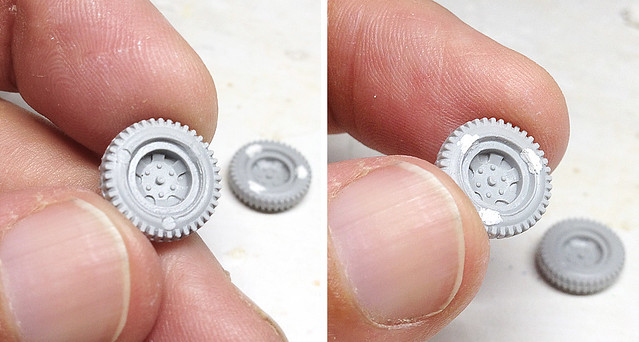
I had to repair the obvious injection marks by using some Milliput.
Once the chassis was completed I tried a test fitting of the ModellTrans cab kit and was very disappointed to find that the two two halfs of the conversion didn't seem to go together easily or precisely. The cab sat precariously on top of the Italeri chassis - I began to doubt whether the Italeri kit was, indeed, the correct donor model (but I double checked the ModellTrans information and it quite specifically mentions the Italeri/ESCI Blitz)!

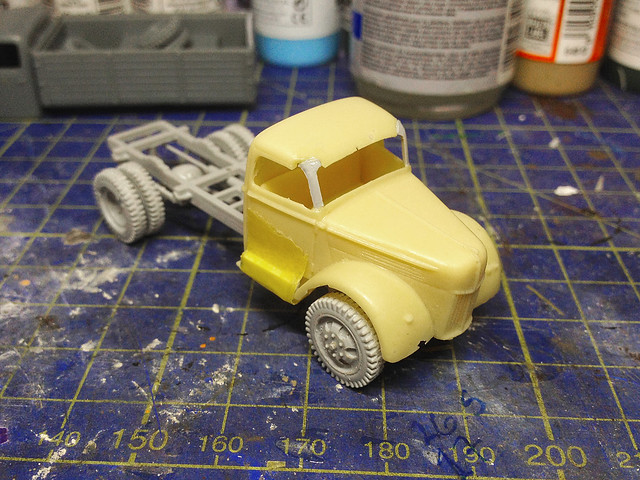
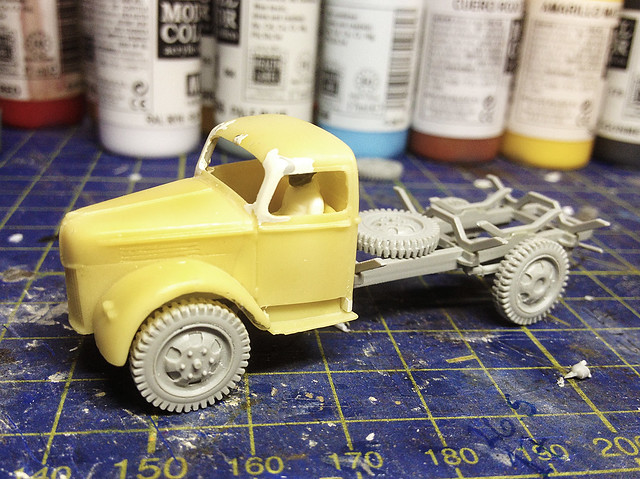
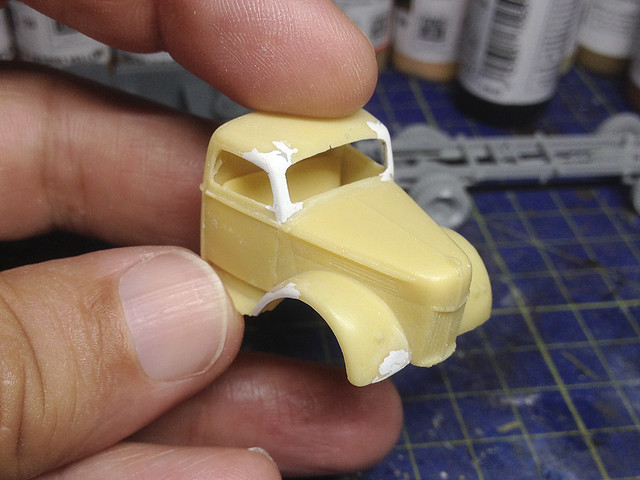
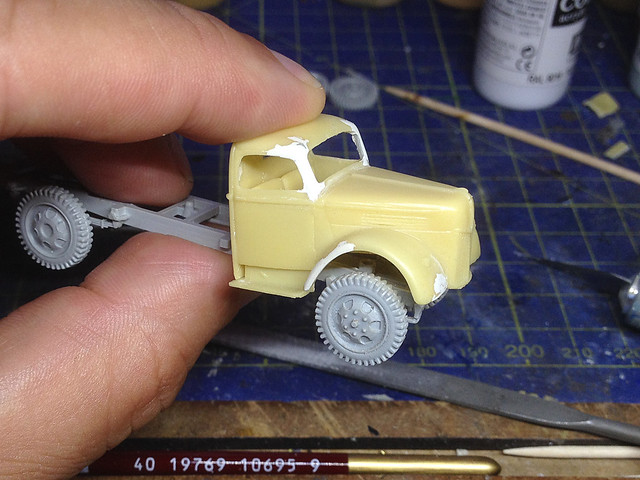
Perched on top of the chassis you can see the start of my repairs to the broken
roof pillars. I now have to think of a way to fit the cab correctly.

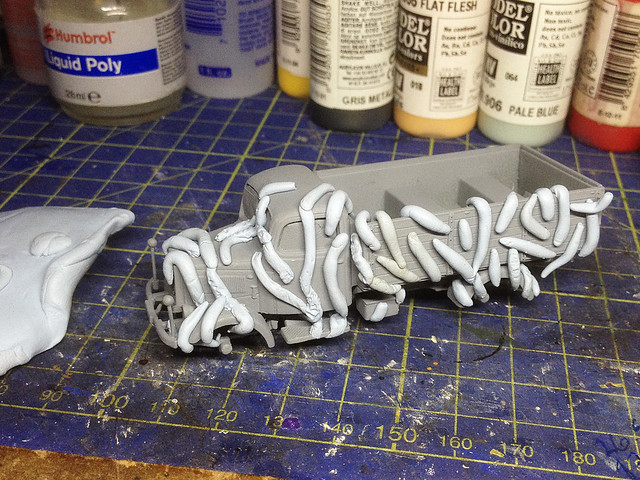
Pausing to think just how to fit the cab to the chassis I turned my attention to the cab's broken roof support pillars. I started by gluing in the similar pillars from the Italeri Blitz kit, but these weren't - predictably - exactly the right shape. But they were useful as reinforcing guides onto which I could add some Milliput modelling putty.


I decided to lay on the putty quite thick with the idea that I would sand back this rough pillar to a finer shape when it dried. Not for the first time I cursed the postman who crushed my model and caused me all this hassle.

I used Milliput Superfine White, which as the name suggests gives a very smooth finish when filed and sanded. I am a bit of a Milliput fan but it does have it's downsides - compared to 'green stuff' - such as it's comparatively long drying time. I like to do any Milliput jobs last thing and then leave the job to completely 'cure' through the night before sanding.


While I was at it I added some putty to other parts of the resin cab that were in need of treatment. There were a couple of little cracks and holes that resin kits are prone too, but nothing serious. The pillars sanded down nicely, although I had to guess at the intended shape and just went for something which looked right.

That done I now returned to the vexing question of the cab's attachment to the chassis. It was clear that the ModellTrans cab sat far too height on the Italeri chassis AND that some of the chassis parts actually stopped the cab sitting level - the wheel arches were far too high above the wheels. Something would have to go!

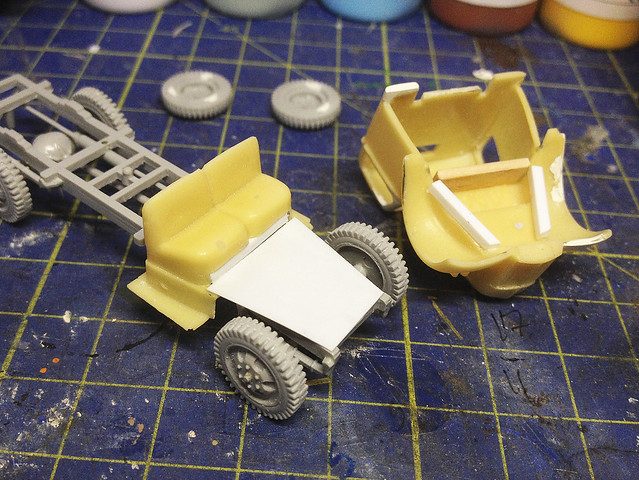
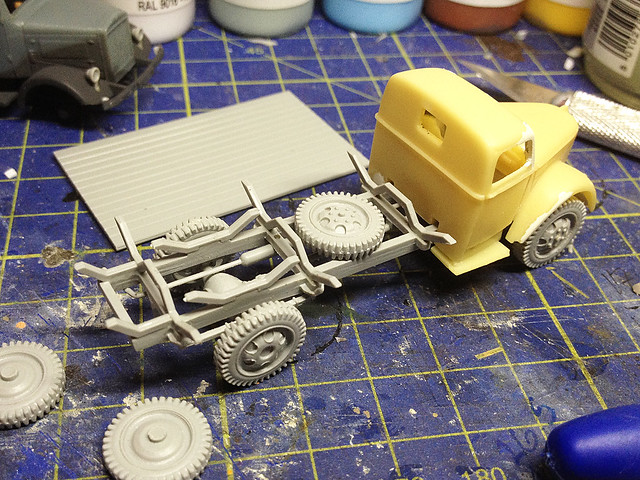
As it stands the ModellTrans cab components just don't sit snugly onto
the Italeri chassis. The problem are the seats.

What seemed to be the problem was the cab seating component, which sits inside the cab and on top of the chassis. The seats were stopping the cab from dropping onto the chassis nicely, I reckoned about half the depth of the seating would have to be removed so that the cab dropped sufficiently. So, I sawed away at the seats - as you can see in the accompanying photo.


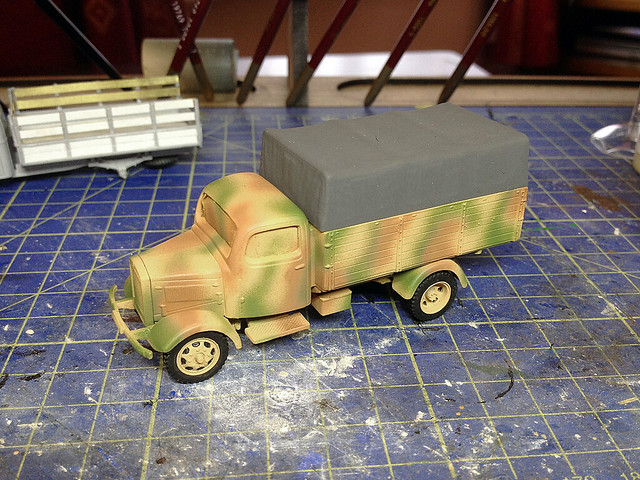
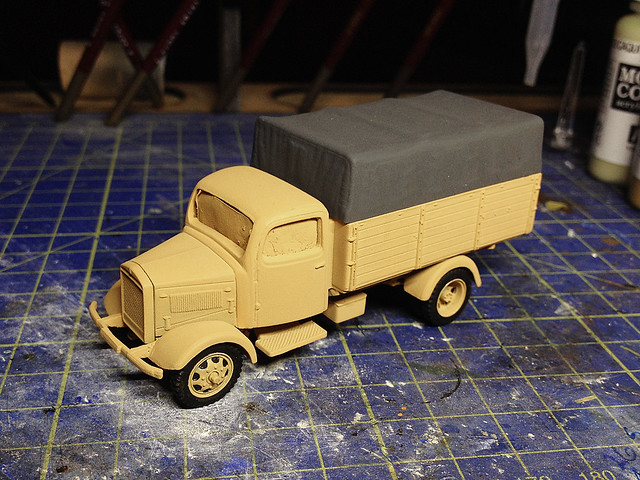
It was a pretty drastic piece of surgery but I couldn't figure out what else to do. Once done, however, the cab did seem to be sitting properly over the wheels (maybe even a bit low, looking at my reference photos, but it;s easy to re-level and build the cab back up again now it's sitting level).


However, that's not the end of the story. I have to work out how to attach the cab securely to the chassis now. Once that is done, and the seating is glued permanently in place, I can spray the base coat onto the chassis/seating before painting the inside of the cab in detail (I will have to find an appropriate driver figure).

Next: Cab final assembly and base coat. Then adding the cargo flatbed.

My thoughts so far: Well, obviously this is not the 'easy option' I thought it was going to be. I'm very disappointed that the kit was broken, but even more annoyed that the fit was not as straight forward as it should have been.

As you can see from my pictures this has very much been a case of 'fudging' the assembly - cutting and fitting until things fit to an acceptable standard. I'm not overly impressed.

Thursday 24 July 2014

ACE 1/72 Kfz. 21 'Desert Fox' staff car conversion project

Isn't it a really nice surprise when a model you ordered takes soooooo long to be delivered that you completely forget about ordering it in the first place? Well this is what happened today, I arrived in my office to find a little parcel on my desk containing ACE's 1/72 'Desert Fox' staff car!


Am I branching into North African campaign models I hear you ask? No. In fact this is for another one of my far-too-ambitious and ill-advised conversion projects. I know how much you like those.

In this case what I want to do is have a staff car for my Finnish Army Project. Finland's controversial Chief-of-staff - Carl Gustaf Emil Mannerheim - received several Steyr 1500 Command Wagons as a personal present from Hitler himself. These were far more practical for visiting the front than his previous present from 'Der Führer' (a huge black Mercedes)...


Unfortunately, while the Steyr 1500 is pretty easy to get hold of in 1/72 scale kit form it is normally the larger and more widely issued German Army 1500A/01 infantry carrier version. I managed to pick up a die-cast model of one of these really cheap a while ago before I realised there was more than one version (in fact there are lots of versions of this vehicle)...


So...What to do? Converting the die-cast model from scratch seemed well beyond my abilities, so I temporarily shelved the project. But, completely by chance, I happened to be reading some info about this range of vehicles and discovered an interesting fact...

The Command Wagon was actually designated the Steyr 1500A/02 Kommandeurwagen Kfz.21 - the important bit here is the 'Kfz.21' bit. Apparently this was a universal design for a staff car which was built by various German manufacturers - the only difference between the types being that the manufacturer seems to have slapped their own engine and bonnet on the car.

So I did a quick search online and low and behold there were some versions of the Kfz. 21 in 1/72 but of the types which had been made by German companies other than Steyr. I soon honed my search down to the cheapest option - the ACE Kfz. 21 (Horch) 'Desert Fox' edition staff car. This I duly ordered.

Rommel's Kfz. 21 Kommandeurwagen, in this case the Horch made version.
The back of Rommel's Kfz. 21 - the same whoever made this vehicle, whether it
was Horch, Steyr, BMW, Daimler Benz, or Volkswagen. Only the front end changed.

AND SO...

The ACE 1/72 Kfz. 21 is the Horch version of this design, having the Horch front end BUT the universal Kfz. 21 back end. All I need to do, then, is cut the front of my Steyr and the back off my Horch and stick the two together to make Mannerheim's field car!

Simples! (...Yet another disaster is pending!)*

* Bearing in mind the pain in the butt my last ACE kit was!

Field Marshal Mannerheim in his 'gift' from Hitler in 1942!
Source: SA KUVA - No. 92947

Wednesday 23 July 2014

A blitz of Blitz'z

I'm not really sure what the plural word for a brace of Blitz trucks is, but whatever it is I be a Blitz'n!


Although my Pegasus 'German Army Truck' didn't turn out to be a Blitz at all it started a theme and I now have no less that three Opel Blitz related projects on the go at the same time. The Pegasus truck will be inheriting some Blitz parts to add extra detail and I also have a conversion job utilising the main parts from an old Italeri Blitz kit. Finally, I will be working on a straight out the box 100% Opel Blitz for my Finnish Army project.

The conversion job is based on a ModellTrans Modellbau resin Ford V3000 cab which is designed - in theory - to fit onto the chassis of the old 1/72 Italeri/ESCI Open Blitz kit. A marriage made in hell if there was ever one according to a few of the online reviews of the Italeri Blitz model.


I've had this resin conversion 'kit' for a while now, it was quite expensive and had to be sourced from Eastern Europe and when it arrived I found that the support pillars on the cab were broken and missing! But when I came across one of the Italeri Opel's going very cheap I decided to give it a go anyway.

Despite the fact that the ModellTrans conversion parts are supposed to be specifically designed to fit the Italeri chassis I found very little clue to that when I tried putting them together. But in MT's defence I did try to fit the original Blitz cab just to see how it went together and that didn't fit too well either!

On the other hand, the Academy model looks very promising and has some good reviews.


Again, I picked this kit up very cheaply (£4.25, thank you very much) at a local store and really look forward to making a kit that should be very detailed and accurate straight out the box (for a change)!

The Finns bought a reasonable quantity of Opel Blitz truck from the Germans in WW2 and I wanted something capable of towing the German PAK 75 (which the Finns also imported). The two seem to be an ideal pairing, I would like another of these kits but I doubt I will get one at that price again.

So there you go. My little work bench is awash with German trucks at the moment.

Monday 21 July 2014

Pegasus 1/72 German Army Truck - Part 1

Preface: Last week I started what I hoped would be a very quick 'bodge' conversion of a Pegasus 'German Army Truck' into a Finnish c. 1940s Volvo 'Roundnose'. Well this project didn't get far before it ran into a problem - in short, the Pegasus truck seemed - in my opinion - a little over-scaled for 1/72 and appeared larger in comparison to the other trucks I have in my Finnish collection.

And so, I have ditched this Volvo conversion until I find another suitable donor vehicle and have decided to build the Pegasus kit 'as is' to make a German Army truck for my Bolt Action collection instead.


The Pegasus German Army Truck - background
As mentioned in my Volvo 'Roundnose' preamble the Pegasus German Army Truck is not the ubiquitous Opel Blitz that many models and war-gamers seem to think it is. It is, in fact, a simplified model of the Mercedes L3000 4x2, a 3 ton cargo transport produced by the Germans between 1938 and 1942.

Top is the Mercedes L3000 compared to the Opel Blitz at the bottom.

This is quite crafty on the part of Pegasus as the 1/72 market is already well-endowed with good quality Opel Blitz kits so producing a 'easy build' kit of the Mercedes means their product does not compete with the multitude of Blitz kits. Which is good for us modellers.

Incidentally, to make this model a true 'Mercedes' all you would have to do is make a tiny Merc badge for the front radiator (I believe Pegasus doesn't call it a Mercedes for licensing reasons).

What's in the box?
There are two sets of sprues - allowing you to build two vehicles - each of which has just 15 components. Really, you can bang together this simple model in minutes.

One thing that's missing there is the driver figure. He seems to have gone
AWOL! There are two identical sprues like this in the box.

However, don't be fooled into thinking that this means a huge sacrifice when it come to detail. Sure, a lot of the smaller parts of the real truck have been excluded - things like headlamps, horns, tools, etc - but what detail there is on the parts included is very nice and crisp.

I'd say that if you wanted to you could build this kit into a very acceptable display quality model by adding the small extra items which aren't included. A nice proposition as the Mercedes truck is only available in kit form in 1/72 from some of the more expensive and niche resin/short-run manufacturers.

Construction
Well, obviously, the first of the two trucks I built from the box is actually a 're-build' as I had already started modifying it to make the Volvo conversion I had planned! (So, annoyingly, I had to stick back together parts I had already cut apart...Luckily I hadn't thrown any of these bits away!)

The reconstructed truck (had to use some plasticard to put the cab and bonnet
back together again) nearly ready for assembly again.
Everything goes back together again very easily and it's a very crisp model.
Obviously I will have to use some putty to smooth out my repair job.

But the second I built exactly as the instructions recommended (at least to begin with). As with their other 'easy build' WW2 truck - the equally unsparingly named 'US Army Truck' - there are no windscreens included in the kit (nor any decals for that matter). But I am getting used to cutting out and fitting transparent plastic windshields now (the trick is to cut out a paper template so you can check the fit first).

Honestly, I can't say much about the construction as there isn't much to do. Everything goes together well and I didn't encounter any problems - and hardly any flash or mould lines at all! So this model is ready to paint in minutes if you want.

Painting
The box art gives a very unspecific colour scheme, but there again there is just so much colour reference material available on the 'web' that you shouldn't be short of inspiration. Admittedly the Mercedes is a little rarer than it's more famous Opel stablemate, but I think Blitz paint schemes would be quite suitable for this model. Specific unit information - and the related decals - is quite another thing though.

My repaired version of the truck will have a German three-colour camo scheme
with the standard 'Dunkelgelb' (dark yellow) base. But before you begin the
exterior painting you have to paint the cab interior first.

The spray I used was Humbrols 'Sand Yellow' which turns out to be an exact
match with Vellejo's 'Desert Yellow' (977), great for touching up. I never really
understood the German's use of Dunkelgelb, it seems such an illogical
colour for anything but the desert yet it was used widly use in Europe.

My very first attempt at a German camo pattern and my first attempt at
airbrushing a camo pattern freehand! It's a bit slap-dash but I'm rather
pleased with the outcome.

What do I think of them so far?...(Not rubbish!)
This a surprisingly nice model. Like their 'US Army Truck' Pegasus allows the war-gamer to bang together a really tidy representation of a 'generic' WW2 truck quickly and cheaply, but with some degree of quality. Yes, I think it is a little big and you may find it looks a little odd beside some of your other vehicles in the same scale, why this is I do not know.

The cab of the Pegasus 'Merc' (far right) compared to two other 1/72 truck
cabs. Left is the Pegasus 'American Army Truck' and in the middle is a
Valiant Ford V3000. As you can see the other cabs are significantly
narrower.  You can see how the 'Merc' looks almost a bigger scale.

I am happy to use this model in combination with my PSC Late War German soldiers as they are somewhat chunky for 1/72 as well, both laying at the upper end of 1/72 scale.

Next: I finish off the trucks and while I'm at it add some extras to the second example to show what can be done to make them a little more accurate.

Weekend update - slow progress

Not that much going on this weekend, it's flown by really so there hasn't been that much model making. However, I did manage to finish off the base coats on two of my projects ready to start the detailed painting.

First off is my 1/300 LAGG-3, this is a new experience for me as it's a completely new and tiny scale but also because I am painting the plane exclusively with brushes. I was a bit worried whether I could achieve a smooth enough finish...


Meanwhile, I had a second project on the go based on my Pegasus German Army Truck set. I'll be doing a full report on this kit later, but this particular build is for my Bolt Action project.

The main challenge for me with this one is to produce an acceptable WW2 German three-colour camouflage suitable for the Normandy campaign. This includes the application of a base coat of the rather startling 'Dunkelgelb' (dark yellow), the practicality of which escapes me!


It's a pretty, if somewhat basic, kit but is perfectly suitable for it's intended use as a wargaming toy.

And that's it really. Pretty disappointing but just goes to show that I do - in fact - have other interests I suppose. Hopefully I will get these two projects finished off this week, but the more summery the weather get's the harder it is to concentrate on these indoor pastimes.

Friday 18 July 2014

Raiden '1/300' Finnish fighter aircraft arrive

Part of the order for '1/300' aircraft models I made at the start of the month was to the Raiden company of America. They have finally winged their way across the pond and landed on my door matt yesterday. So let's have a look...


The order was for a F2A Buffalo, a Fiat G.50 and a P-40F Warhawk - all candidates for my little Finnish air force. Of all of these aircraft it is perhaps the Buffalo which is most closely associated with the Finn's dogged defence of their country. Indeed, they did far better in this much maligned obsolete American fighter that did any of it's other users (particular the RAF) scoring a good number of 'kills' with it.

"The Brewster Buffalo earned a reputation in Finnish Air Force service as one
of their more successful fighter aircraft. In service from 1941 to 1945, Buffalos
of Lentolaivue 24 (Fighter Squadron 24) claimed 477 Soviet Air Force warplanes
destroyed, with the combat loss of just 19 Buffalos, an outstanding
victory ratio of 26:1." Source: Wikipedia

The Raiden models are actually 1/285 scale and I'm afraid - unbelievably - you can tell the difference between these and the 1/300 aircraft I got from Scotia Grendel, Raidens being somewhat larger. A shame really as I was hoping the difference would be negligible.

Quality wise I think the Raiden planes may just have the edge with a lot more fine panel-line detail. The amount of flash and quality of white metal used is about on par with the UK firm's models.

Raiden's 1/285 scale planes (top) compared with a couple of Scotia Grendel's
1/300 aircraft. It's hard to tell, but the Raidens are just a tad larger.

I was particularly looking forward to receiving the P-40 Warhawk as the P-36/P-40 Hawk family of fighters is one of my all-time favourites.

Piloted by Sub.Lt.V.A.Ruevin form 191st IAP on 27th December 1943 a P-40M
made a forced landing on the frozen Lake Valkjarvi, Karelian Isthmus. Finns
captured it in perfect condition. It was overhauled at the Mechanics' School
and delivered to HLeLv32 on 2 July, 1944. It was used till 12th February 1945.
Artist: © Jouni Ronkko 'Jones' - Source: Wings Palette web site

The last little plane is a very cute little Italian Fiat G.50. Once again the Finn's squeezed every last drop of effectiveness out of this obsolete design gaining a unprecedented kill/loss ratio of 33/1 [Wikipedia].
Source: Wikipedia

As with my earlier Scotia Grendel delivery these little models are just a whim on my part and not really part of a serious project. They are just something fun to do when I need a rest from my current 1/72 models!

Tuesday 15 July 2014

Minairons 1/56 1937 Chevrolet truck - coming to 1/72 scale

Very, very chuffed that Minairons have now released their 1/56 1937 Chevrolet 1.5 ton truck kit, not that I 'do' 1/56 (yet) but because they are now working on a 1/72 version of the wargame quality kit.

The '37 Chevy truck is yet another vehicle that was pressed into service by the Finns during WW2 (as if their motor pool wasn't eclectic enough).  The 1/72 version should be released in 2015, which is great for me as that should come out just in time to finish off my Finnish logistics collection.

Finnish war correspondent hitches a ride on a '37 Chevy's running board
in 1941. Photo source: SA KUVA

Photo source: Minairons Miniatures

I am becoming a bit of a fan of Minairons Miniatures, even though I haven't bought a single model of their yet. The specialise in Spanish Civil War era models and they don't seem scared to try out some of the more niche and exotic vehicles times from that period. The good thing about this is that much of their stuff fits nicely into the Very British Civil War genre.

Scottish Republican artillery for VBCW game.

As I mentioned in a previous post they have actually produced a set of fictional 'Scottish Republican' decals for some of their vehicle kits specifically for the VBCW game. So the next project after I eventually finish my Finns is taken care of then!

Links:
- Minairons official web site and online store: www.minairons.eu/en/
- Minairons official blog, development journal and 'wish list' pages