Final component additions...
There are a few parts to still be attached before the model is - essentially - complete. These include the undercarriage, the exhaust stubs and the Pitot probe.
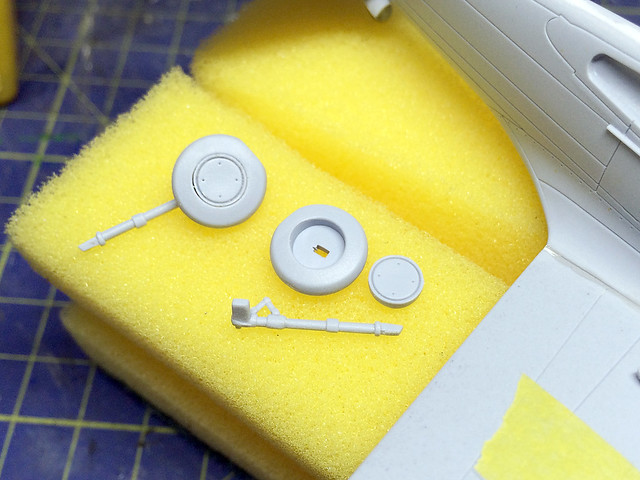
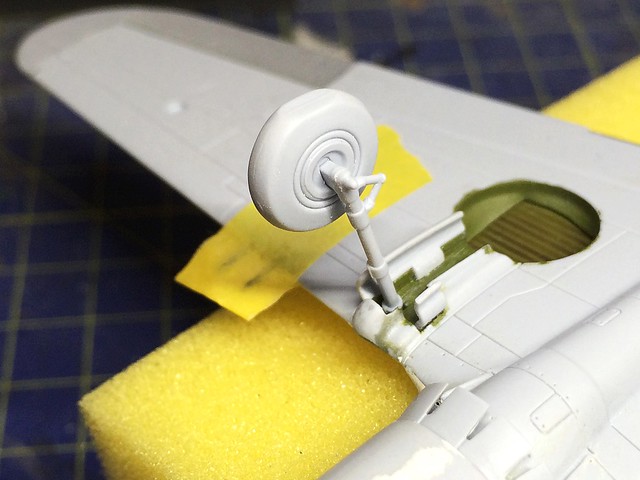
I am building the Airfix undercarriage 'as is' and not adding any scratch built hydraulic cables. So after cleaning up the components it's onto the spray booth for priming...
Then the parts are hand painted. I didn't have an 'aluminium' for the landing gear struts so I just mixed a little flat black with silver, the wheel hubs were done in the same Hakata 'Sky' light blue-green and - finally - the tyres were painted with a new colour I bought, Vallejo's Panzer Aces [306] 'Dark Rubber'.
I was very pleased with the Vallejo rubber colour and will use it by default on all my tyres from now on. It's a warm, dark grey with just a hint of blue (I think) and really is a wonderful base for creating rubber tyres.
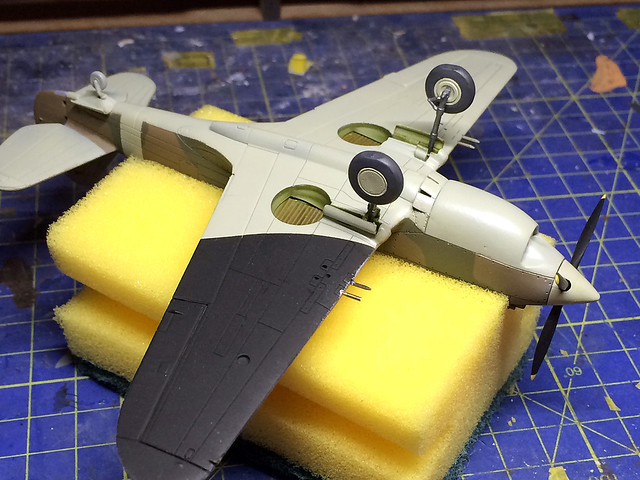
The landing gear was assembled and glued into place, so I now have to be extra careful when handling the model in case I knock one of them off. I also popped on the prop - which I finished painting - but I haven't glued it on permanently as I want to make use of the hole for the prop as a means of supporting the model while spraying it.
Now I move onto the last two smaller parts, beginning with the exhaust stubs...
The obvious flaw with these parts are that the 'pipes' are not hollow, so the simple remedy for this was to drill out the stubs to make them more realistic...
Painting the stubs caused me some head scratching as opinions seem to vary about what colour they should be. Airfix seems to suggest using a dark grey, but my research seems to suggest a metallic bronze-brown...
Next up is the Pitot probe which is positioned near the end of the port wing. What is it?
'A pitot tube is a pressure measurement instrument used to measure fluid flow velocity...It is widely used to determine the airspeed of an aircraft...' [Wikipedia]
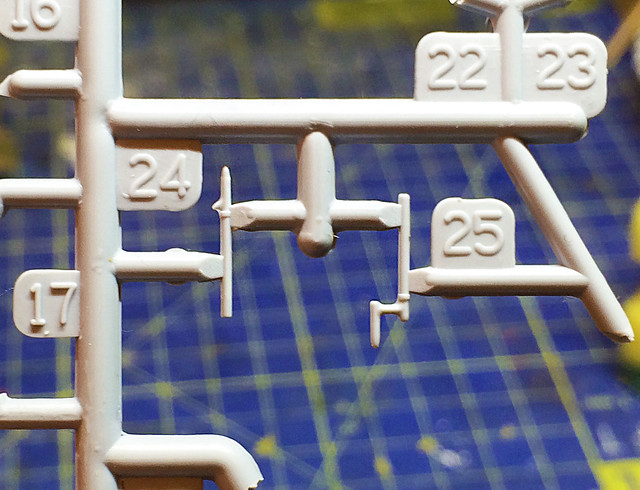
On the left is the US style Pitot probe [24] and on the right is the RAF 'cranked' probe [25].
Airfix provides you with two pitot probes, one for US aircraft and one for British. US Army aircraft sported the straight probe while the RAF fitted what was termed a 'cranked' probe, a sort of 'L' shaped tube.
Aside from a couple of small repairs - I finally managed to break off one of the delicate wing-mounted machine-gun barrels, it was inevitable - I am just doing some paint touch up to rectify some small blemishes. But otherwise that is the majority of construction complete - the exception being the cockpit canopy
I'm not sure when to attach the canopy. I could do now I guess and then mask it out to protect when I start weathering. Or I could wait until I've done the weathering then attach it...I shall have a think about that...
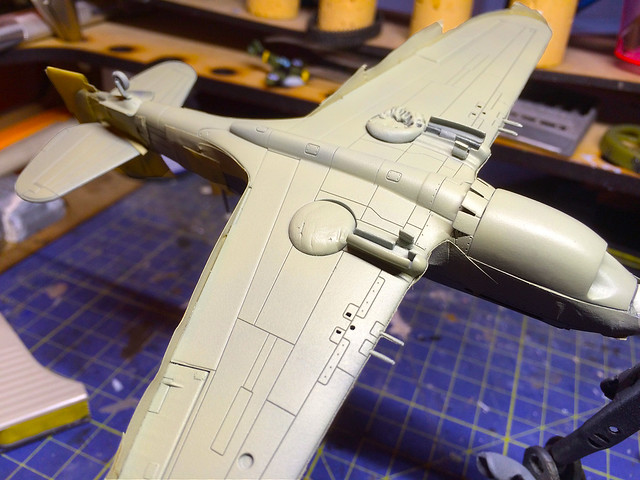
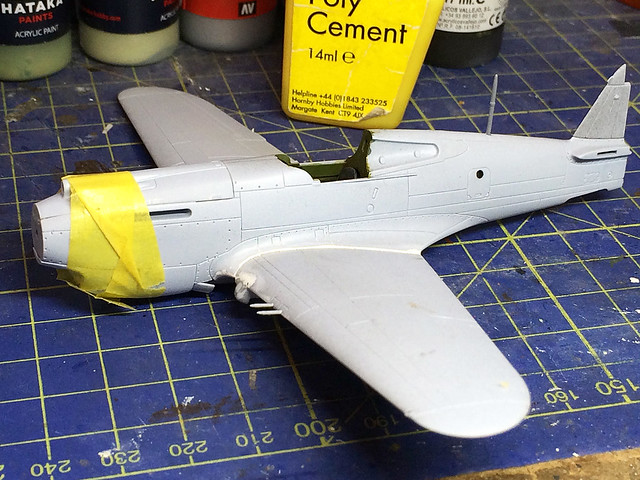
I've completed the basic colour scheme on the underside of my Tomahawk and now have to remove the masking tape ready to start the job of re-masking in order to spray the top-side. This gives me a glimpse of those undercarriage wells and I'm pretty pleased with how they look - the BluTack masking worked and I got a nice clean finish...
My main worry now is the Hataka paint, but it's now a case of having paid for it and started using it I best muddle through to the end with it. I'm pretty sure the problems I had with the underside coat was an issue of dilution, I have a suspicion that the Hataka paint needs to be mixed thinner - to aid flow through the airbrush - but then needs several coats to build up the required finish. We shall see.
Update: Had a lovely reply from Hataka themselves to a query I made on their Facebook page. They directed me to a review of their paints on the AeroScale web site which includes comparisons and suggestions regarding dilution and compatible thinners: AeroScale Tool Review - Hataka Acrylic Paints.
AML's reference sheet for their 26 Sqdn. decal set.
Back to the masking tape (I must get a selection of different sizes to fit the different nooks and crannies that need to be covered plus some wide tape for the big areas). Obviously I'm reversing the masking in that I am covering the underside that I have painted in order to spray the upper-side. I'm trying to 'underlap' by masking nearly up to the line where the Sky colour finishes but I leave a tiny bit of Sky (about half a mil) so I can over paint it with the Dark Earth to give a nice smooth demarcation between colours.
OK, that looks nice enough - aside from the inevitable tiny hairs - where do they come from? Still I carefully removed them and think I can touch in these tiny blemishes. The Dark Earth colour looks a bit on the light side - in my opinion - but checking through colour reference photos it seems to come within the margin of acceptable RAF early war camo-brown. In any case I will be weathering this model so starting a little on the light side isn't a bad thing as it will tone down once the weathering is applied.
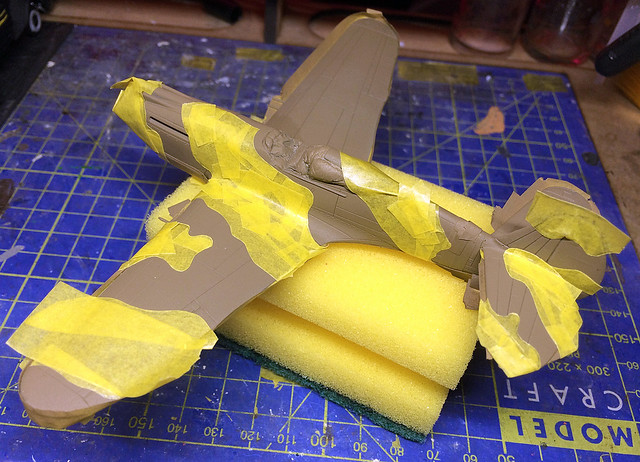
Now to mask for the RAF Dark Green. I'm going for a hard-edged cam pattern - I think that is correct - using masking tape rather than Blu Tack (which gives a softer edge)...
Half the Tomahawk masked, phew!
I just judged the green pattern by eye rather than doing it 'properly' by enlarging the AML colour pattern sheet up to 1/72 scale and then using that as a template with which I could cut the patterns accurately. I think there is wiggle room as regards authenticity and my interpretation will be close enough.
Dropped Hataka paints: I'm afraid I simply lost confidence in the Hataka paints, mainly as they simply refused to play nicely with my airbrush. I had repeated blockages despite trying a few different thinners and so have now reverted to Vallejo paints. The 'Dark Earth' was Humbrol's and the Dark Green I am about to apply is Vallejo's Model Air No. 12.
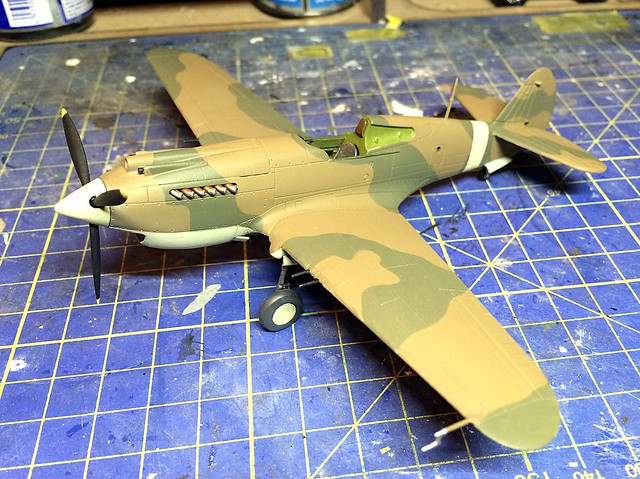
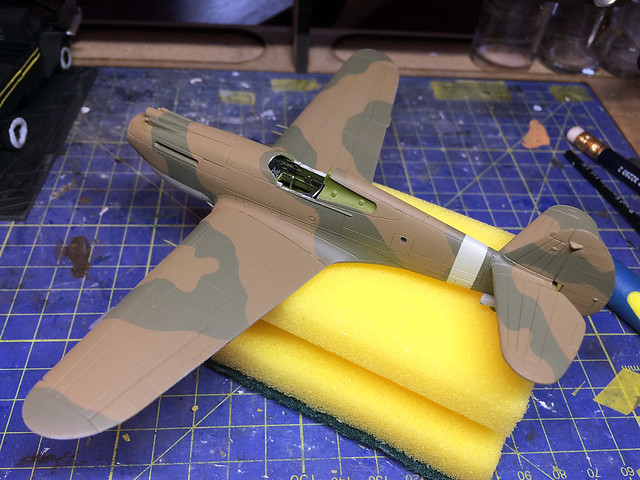
I was very pleased with the results of my airbrushing as I haven't done a lot of camouflage painting as yet and this is my very first RAF camo scheme. The decision to paint the sky fuselage band first and then mask it was a good choice as it came out really well.
Another positive was that the addition of the RAF Dark Green has toned down the Dark Earth - which I was worried might be too light - and the overall effect is a relatively acceptable interpretation of the RAF's early WW2 camouflage scheme. I think once I spray on a satin varnish it will be a quite satisfactory job.
Well, that didn't turn out to be the disaster that I was worried it might be! I think I may even have made some progress in my modelling. In fact I think I will go and reward myself with a nice mug of tea and a ginger nut. :)
Next: Touching up and repairs before varnishing prior to adding the decals.
Now the fun begins! It's onto the priming - using Humbrol's Grey Primer Matt - 150ml Acrylic Spray Paint - AD6001 (I am not making the move to airbrush applied primer until I use up my stock of this 'rattle-can' primer). So, it's a last chance to check over the model and fix any remaining issues, fill any gaps, smooth off any raggedy edges and - importantly - clean off any dust specs...
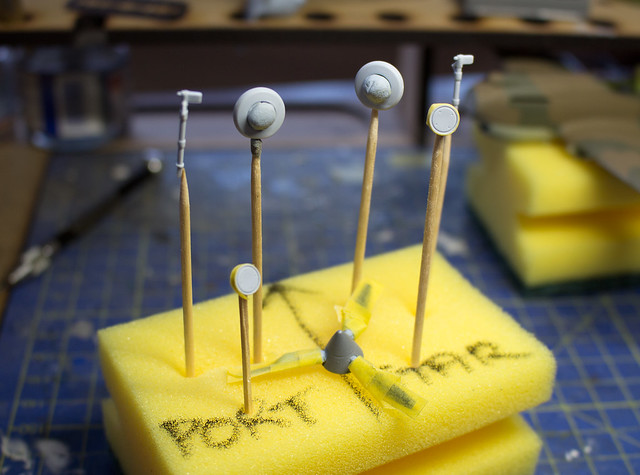
I masked out the cockpit with BluTack and stuck a cocktail stick into the prop shaft - held in place with more BluTack - to give me a convenient 'handle' for spraying.
You can also see my patented 'KitNoob all-purpose model clamp' which is simply a kitchen sponge split down the middle so it opens up to gently grip the model...
I pushed blobs of BluTack into the painted landing gear wells to mask them and I checked over the underside of the model for any blemishes or dinks that will show up after priming.
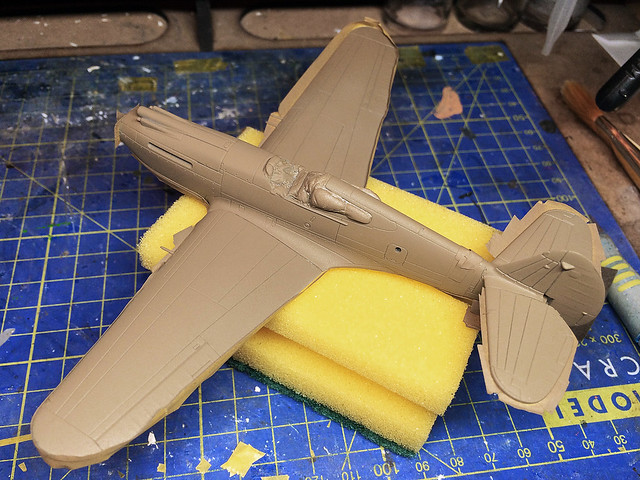
I really like the priming stage, though it is a moment of truth - did you really sand all the seams flush and was your filling good enough? There is nothing that makes me happier than a nice clean primed model - a good canvas increases the chances of a good painting job (I hope)!
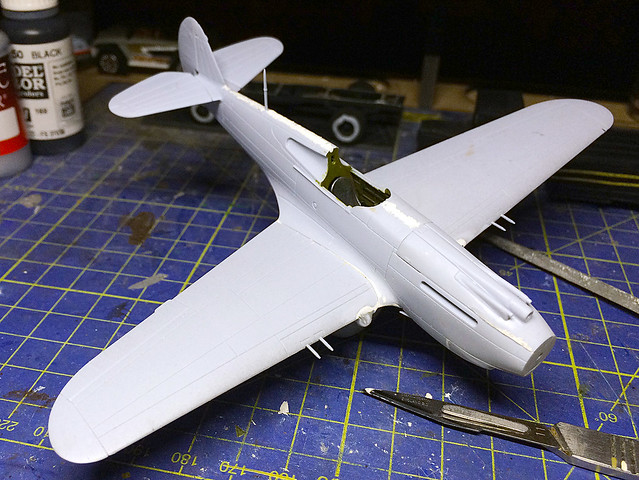
Primed and ready to go!
Now I have to decide how to tackle the shading - do I pre-shade or add the shading on top of the basic paint scheme? I haven't had much success on the couple of pre-shading experiments I have done, but then I didn't have a proper airbrush before.
My Revell 'Starter Airbrush' is good quality but isn't a brush capable of 'fine' spraying - the spray is what I would describe as a medium size (I understand this is dictated by the size of the needle in the airbrush). Good enough for most general jobs but not up to the task of very small jobs - certainly the fine lines I want to spray on for pre-shading might be beyond it's ability. So, sadly, I will leave off pre-shading panel-lines until I have an airbrush capable of spraying a line of a couple of millimetres in width.
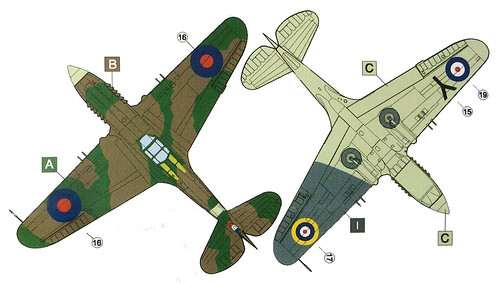
RAF Europe Colour Scheme (1939-1941).
Right, onwards and upwards. The RAF scheme for 'Early War' - as given in my Hataka paint set - is as follows:
• Dark Earth — Used for upper surfaces in RAF camouflage schemes until 1941
• Dark Green – Used for upper surfaces in RAF camouflage schemes throughout the war
• Sky 'Type S' — Used for lower surfaces of RAF aircraft until 1941
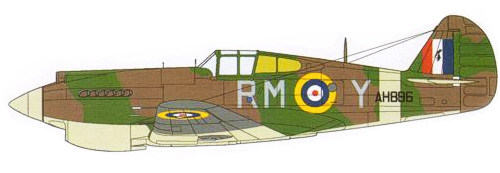
AML's scheme for an example of a Tomahawk IIA of 26 Squadron, England, 1941
Note: The medium grey on the underside wing is actually black!
I will start with the underside which is mostly Sky 'Type S' apart from the novel exception of an area of the left wing, which is painted black. I haven't been able to find out why this was or if there was a particular meaning to this colour scheme [I'm sure a reader will put me right] but I *guess* it could have been to aid recognition. Anyhoo...
There is a band of the 'Sky' colour which wraps around the fuselage so I will include this in masking the spray that as well (rather than over-spraying the upper-side camo). However, before that I noticed that the cockpit's rear windows are painted with the 'interior green' so I will have to remember to give those a splash of paint as well.
Sky 'Type S' is a funny colour. When you say 'sky' you think of a light-blue but 'Type S' is actually a greeny hue if anything. The Hataka colour seems spot on but I am less happy about the consistency of the paint.
This is the most Hataka paint I have used - the first real job I've done with it in fact - and I had a couple of problems getting it to play nicely with my airbrush. The first issue was just how much I should dilute it with thinners and still get an opaque coverage (even after a couple of passes with the air brush). The second issue was how quickly the Hataka paint dried.
For the very first time I was finding that the paint in my airbrush was drying inside the airbrush and thus causing blockages. This may be to do with the dilution mix - perhaps I was using the paint too 'straight'?
I'll finish at this point and do some research on mixing Hataka paints before I move on to the upper fuselage coat of Dark Earth. Hopefully I can find a solution (excuse the pun) to this problem.
On to panels 11 to 15-ish of Airfix P-40 instructions. I say '15-ish' because I won't be sticking religiously to suggested order of assembly (owing to how I have decided to paint the model). The main job, now, is the assembly of the undercarriage...
The undercarriage components. I've started cutting the parts off the sprues with
plenty of room to spare on the attaching sprig. Then I will trim the unwanted
sprue off - past 'accidents' have taught me to err on the side of caution.
I may want to lay-off attaching the completed undercarriage until I have painted the airframe, though, as all these sticky out bits might hinder my masking and airbrushing. But I will test fit everything before painting these parts separately.
The main landing gear is nice enough, but as with everything else it is simplified. Sticklers for accuracy might go to the additional lengths of adding the hydraulic cables (brake line) using pieces of wire and the tyres have no tread pattern. But I'm keeping my P-40 'no frills'.
There was quite a bit of sanding to get the hubs to fit into the wheels.
The landing gear are pretty delicate, which is another good reason to leave these off until I am ready to mount the model on a display stand. A bit of a knock would be enough to break them off.
The tail wheel is less likely to either interfere wit the painting or get knocked off so I did fix this in place. There is no detail at all here, which isn't a big deal as it will be practically unseen, but you should be aware that there is more to it on the real aircraft - so, like everything else, if you want to 'super-detail' your P-40 you will have to do your homework.
(I highly recommend 'P-40 Warhawk in Detail' by Bert Kinzey, Squadron/Signal Productions. It has very detailed photographs of the aircraft, with all it's nooks and crannies shot in close-up.)
Finally, prior to my actually starting the painting, there is the pilot's headrest to add. There are still some other parts which need to be added to complete the build - the exhaust stacks and the wing-mounted pitot probe - but, like the landing gear, I am attaching this after the basic paint scheme has been applied.
As much as I want to stick to the 'out the box' build idea I really don't like the shape of Airfix's headrest. The size and shape of this cushion just doesn't seem to match any of the reference photos that I have seen, so I'm going to do a little 'modding'...
Now, all that's left to do is to start masking out those areas of the model that I don't want affected when I spray on the primer coat (cockpit and undercarriage wells). Then it's on with the Humbrol Grey Primer.
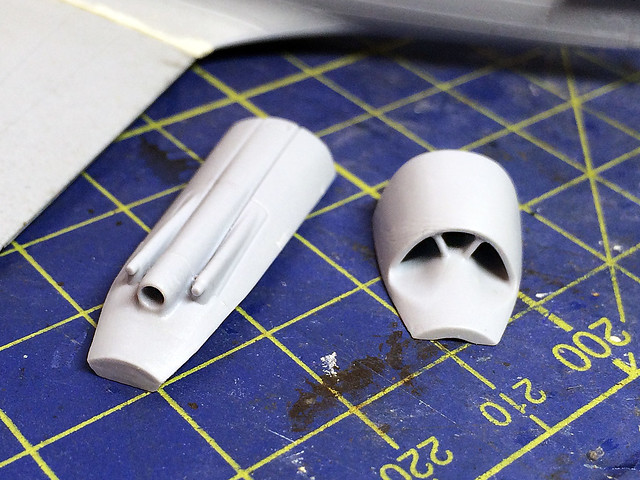
Nose job
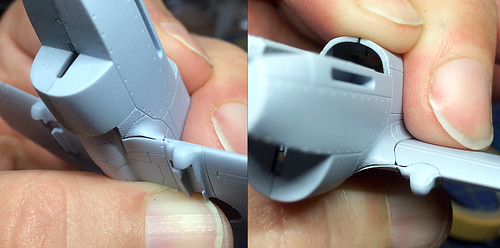
Having glued the P-40's nose components together I found that was just the beginning of the work. I mentioned how I thought Airfix had been clever in the way they had decided to lay out the nose of their model, making it a four piece design - with the two fuselage halves (left & right), the air intake (bottom) and the .50 cal gun cowling (top) - but this cleverness comes at a price.
The nose is now nice and circular, but I had to sand it into this shape.
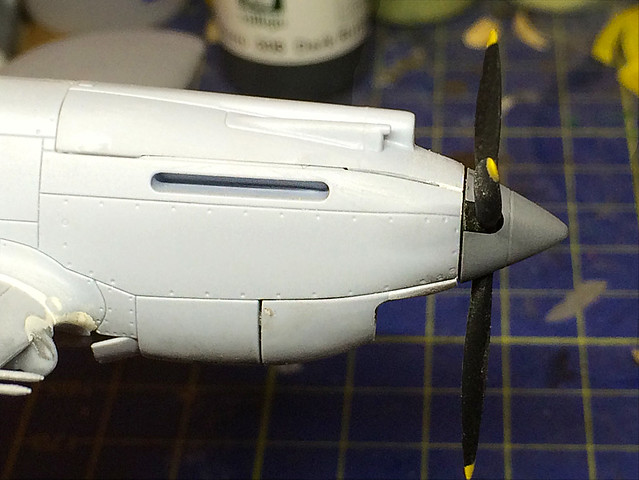
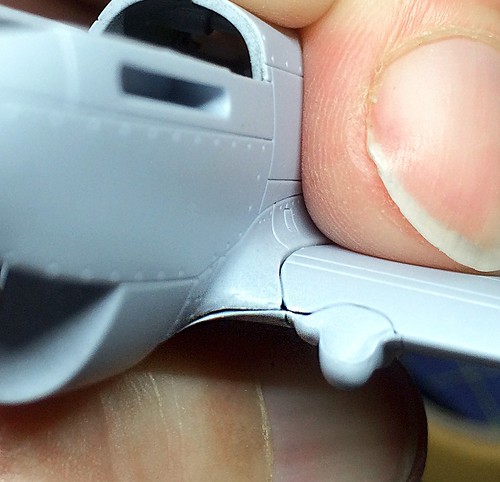
The four components come together reasonably well and the fit is tolerable, apart from two exceptions. The above photo highlights the first issue, the propeller spinner profile, which should be perfectly circular - to match the prop spinner - but due to the various fuselage parts used the shape isn't quite right when everything is glued together (in fact it was more oval before I sanded it).
However, it's not a biggy and can be quickly rectified. I ended up popping the propeller on and drawing around the spinner, marking the circle of the spinner on the nose in pencil, and I then sanded the nose into shape. The nose profile is now correct...
After sanding the spinner blends smoothly into the fuselage giving
you a nice 'sharp nosed' aerodynamic profile.
The above photo also shows the other problem with Airfix's nose assembly design - the 'chin' has a nasty join right around the middle. The P-40's 'chin' isn't a two-part affair so this joint will have to be filled and sanded smooth to hide the unsightly seam...
I had to slap on a little more Milliput than I wanted to as the 'chin' has a few imperfections in the moulding - small wrinkles or lines - so these had to be covered as well.
From nose to tail...
While I had the Milliput out I filled the seam that runs down the 'spine' of the P-40, standard work for an aeroplane kit (it's not a bad point of the model). In fact, of course, the seam runs down the bottom of the fuselage too so that must be filled and sanded as well.
I said, in my last post on this project, that having to fill noticeable seams is annoying, particularly for beginners (who may not be 'into' modelling to such a degree as to have adopted modelling putty as a standard part of their 'tool kit' yet). But, having thought about it there will always be seams - it's the nature of multi-part plastic kits - so the novice builder will inevitably adopt products like Milliput or 'Green Stuff' quite early if they are at all serious. It's not an 'advanced' technique but perhaps one of the first 'intermediate' skills that they pick up (it was with me).
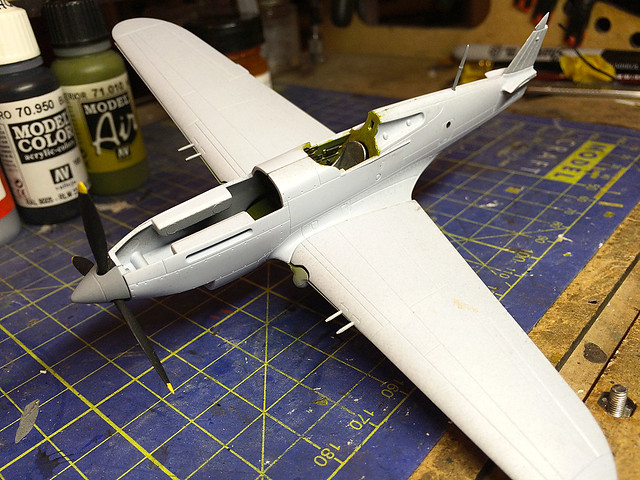
Anyhoo, that's quite a different tale, let's move on to panel 9 of the instructions which deals with the Tomahawk's actual tail...
Easy job, nice fitting parts, but it's a bit of a landmark stage in the kit construction as this is where the fighter begins to look like a near-completed air-craft and when no bloke worth his salt can resist 'flying' the model around (while making pretend fighter-plane sounds when no-one else is in the room)!
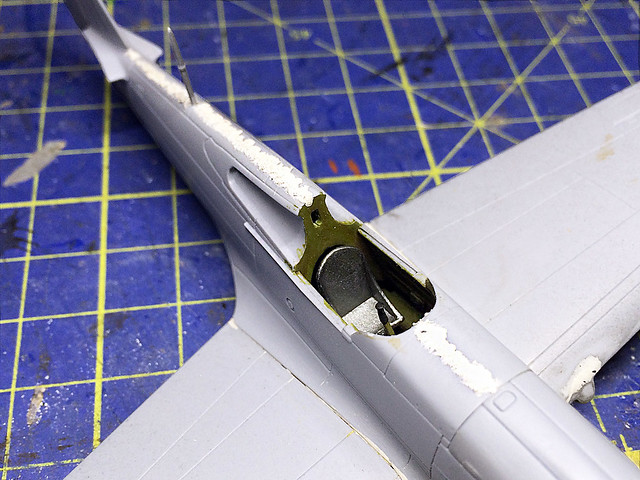
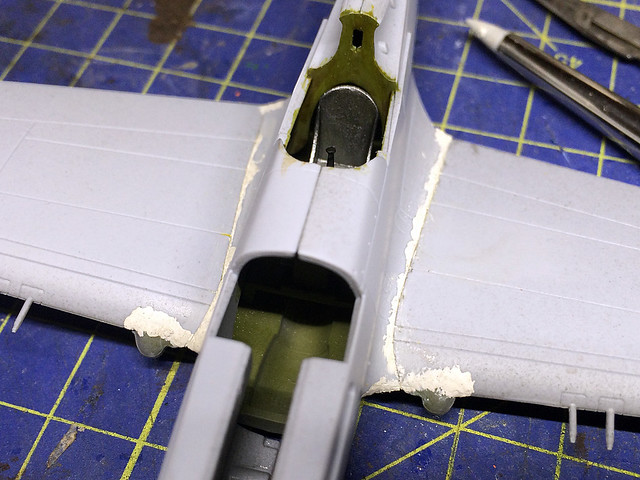
At this point I'll go back over the model and fill any other seams or tiny gaps that I think need attention as I approach the painting stage. This marks the conclusion of the main aircraft construction, I now only have to attach the undercarriage doors in the 'down' position...
There's a bit of re-painting of the wheel wells required (I should have added these undercarriage doors before painting the bays). The masking tape was put on to help protect the wing mounted guns, which are a little delicate.
This was a little tricky as it took me a while to figure out what I *think* is the correct arrangement of the parts. I glued the little doors in what seems to be indicated by the Airfix instructions...
'Watch out for the wing roots!' Someone told me just before I started this project. And here's where we find out what they meant.
As I showed in my last instalment of this build I had already noticed - during a 'dry fit' - some gaps where the wings and fuselage joined. My problem now was how to rectify this or how best to manage this problem at the gluing stage. Putting the glue to plastic always seems a permanent action and not the time to suddenly think of a better way of doing this once you are done sticking things together.
I did a bit of jiggling about and decided in what position all the various parts sat together best. It was a case of choosing the least bad fit!
The wing root seam was a bit adrift with a noticeable gap between fuselage and wings. Though as I showed in my last post the main gaps were at the front of the wing roots where all three parts - lower wing, upper wing and fuselage - meet.
There are various ways you could try to rectify this, I've seen some modellers try and 'pull' the wings up and together to get rid of the seam gaps but I don't think this will work for me. I think it's a straight forward job of filling and sanding...So it's Milliput time...
I found this tricky as I did want a join line to show, I didn't want a smooth and seamless merging of wing and fuselage.
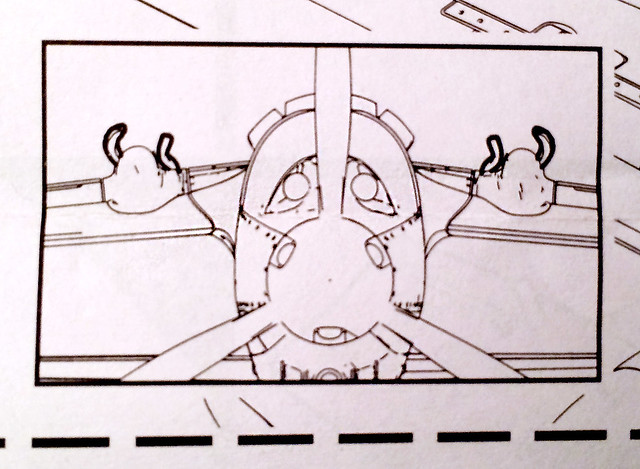
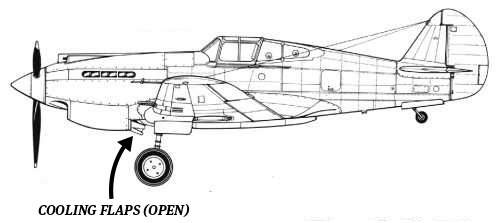
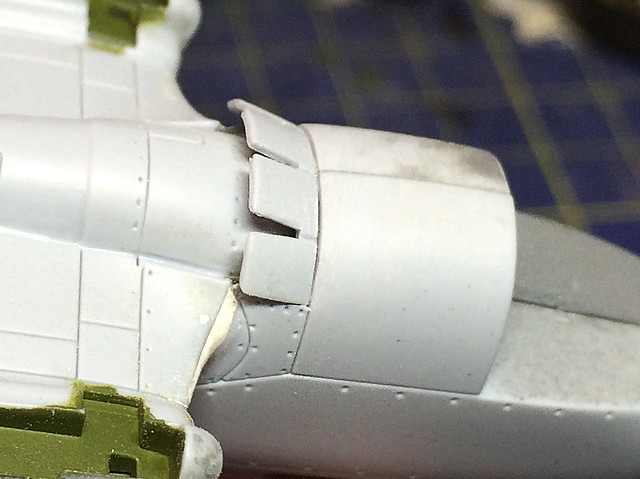
The cooling flaps Panel 7 of the Airfix instructions relates to the fitting of the cooling (or cowl) flaps, which sit below the nose just aft of the air intake. Airfix offers optional parts for this, the flaps in 'open' position and flaps in 'closed' position...The question is, when/why do you use either of these parts?
From what I understand - the flaps aid in the air-flow over the radiator. The air goes in through the P-40's big 'mouth', cooling the radiator and exits via the cooling flaps. So, the more open the flaps are the more efficient the cooling but - as a consequence - the greater drag. So, I believe that - in order to maximise combat effectiveness (regarding high-speed aerobatics) - the flaps are designed to close when the throttle is opened thus reducing drag, and open again as the throttle is closed! [Feel free to correct me if I have this wrong!]
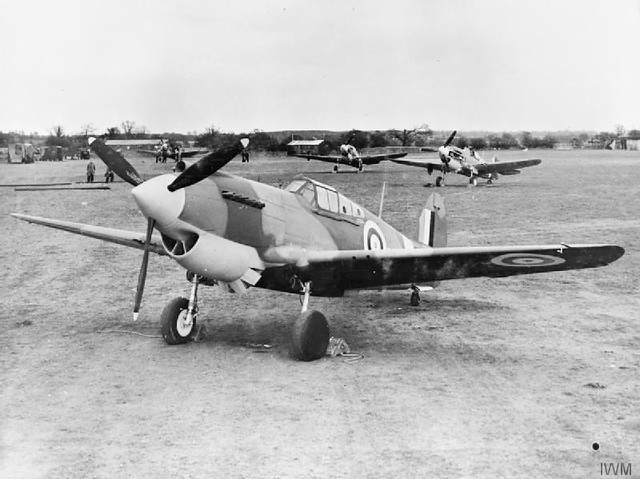
I have decided to model my Tomahawk on the ground - just as in the above photo - so I will be choosing the open flaps option. It's a shame that the instructions don't explain why there are two options and when to use them. (Even something as simplified as a drawing of the landing gear down to accompany the 'open flaps' instruction panel and a drawing of the landing gear up with the 'open flaps' panel would be a help to the beginner. Of course, experts would point out that this isn't a hard and fast rule - that, for example, a pilot would have the cooling flaps closed on take off as the throttle would be fully open and likewise when cruising they would have the cooling flaps open! If that makes sense?)
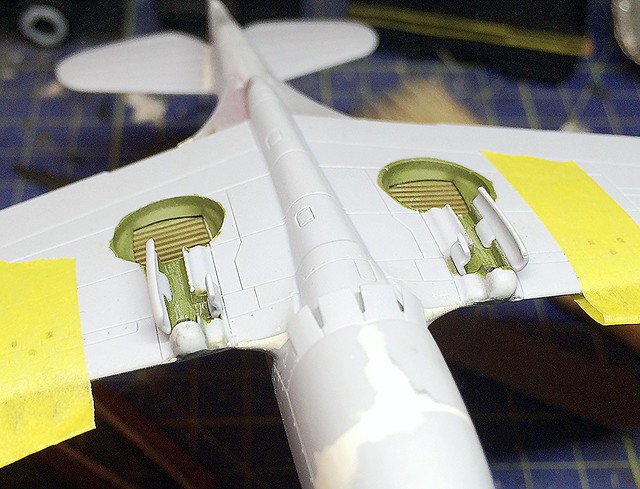
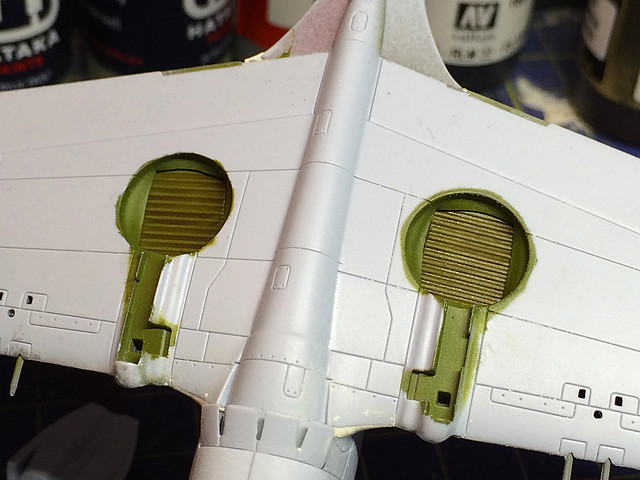
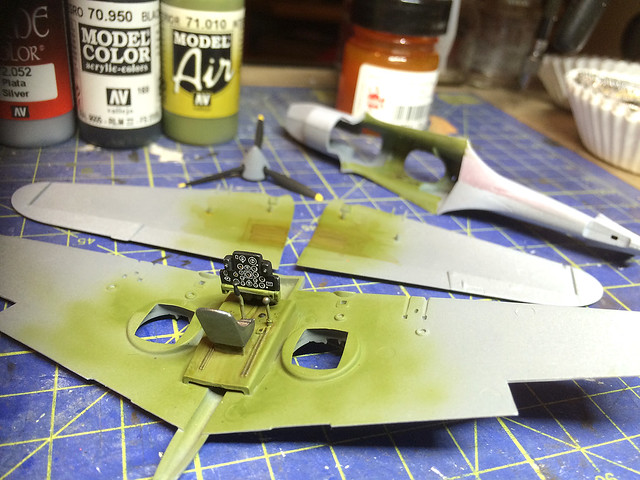
While looking at the underside of my Tomahawk I should mention that I finished painting the undercarriage wells. I had already painted the 'top' of these wells which are part of the underside of the upper wing components (these consist of a square shaped louvre - or striped - pattern). But you also have to paint the lower part of these wells which are integral to the lower wing section. Again, I have used Vellejo's Interior Green shaded with a tinge of yellow.
And finally, I come to the bit in the modelling of this P-40 that I've been looking forward to...The fitting of the signature nose components.
The Airfix approach to creating the distinctive P-40 nose is novel, but I can appreciate why they have done it the way they have (rather than simply making the upper and lower nose integral to the rest of the fuselage halves). In giving you these components as completely separate parts they have been able to create smoother and more realistic models of the Tomahawk. For example, the tubular carburettor air intake on the top of the nose is beautifully shaped by Airfix, which might not have been the case had it been a two part construction with a centre-line seam.
Lovely mouldings, the Airfix nose detail really makes the P-40. They're the most distinctive features associated with the legendary aircraft that would have suffered had they been moulded as part of the fuselage pieces, in two parts.
Just to re-cap; I got the fuselage glued together and the propeller assembly done. I was in a bit of a quandary about when to attach the prop, Airfix suggest early but I was concerned about how that would complicate painting later on. So I decided to leave the propeller off for the time being.
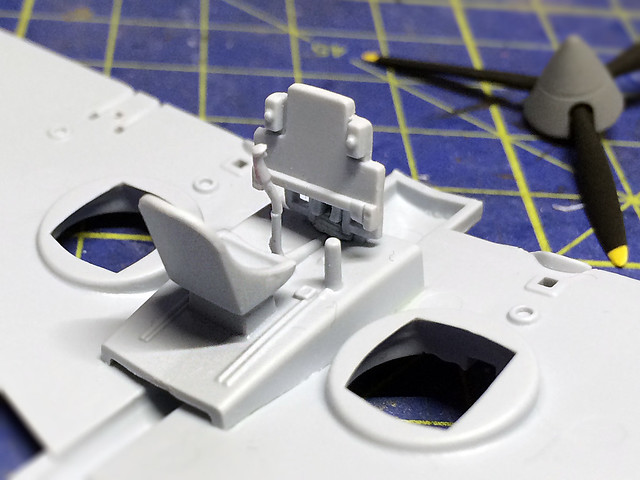
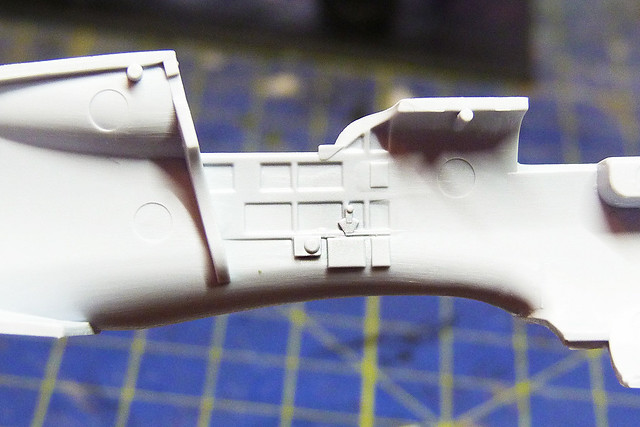
All of a sudden there is a lot going on with my Airfix Tomahawk IIA as the slow start of my previous post gives way to work on some of the major components. To begin with, though, I put the finishing touches to the cockpit.
No dials? Nope - there is a very nice decal to add to the control panel. Some of the
other elements are a little 'chunky' - check out that thick post to the right of the
pilot's seat. That's the auxiliary hydraulic pump handle, which allows the pilot
to jack up/down the undercarriage in an emergency. It should be a quarter of this
thickness. I will probably replace this.
The last parts of the cockpit interior are the cabin floor, control panel, pilot’s seat and joystick. As with the rest of the cockpit detail these items are somewhat simplified and ‘chunky’. There are plenty of much finer third party upgrades available if you really want to ‘pimp’ your Tomahawk, but I don’t think the level of detail is all that bad for a part of the plane’s interior which is partially hidden.
But this leads on to the big job of attaching the wings to the fuselage.
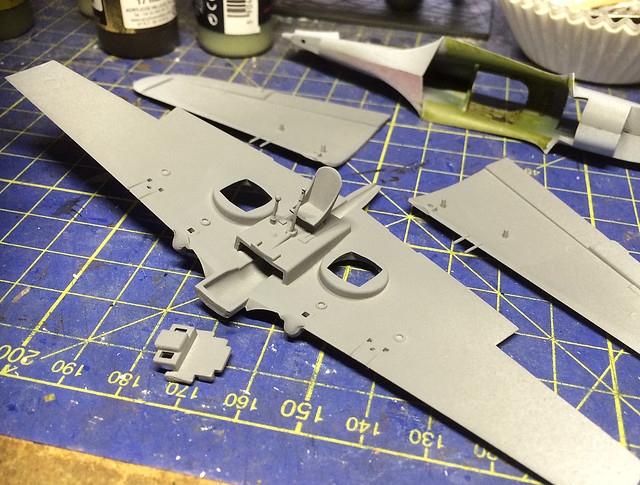
Wing components and cockpit interior primed and ready to paint.
The big one-piece belly and lower-wing component (which incorporates the inner-cockpit) is a pretty solid piece. I considered this a nice plus point as it means you worry less about a sturdy wing alignment - an aspect of aircraft kits that used to infuriate me when I was a junior model maker (squint wing syndrome).
Test fitting the fuselage to the under-wing did seem to indicate that there would be the inevitable filling to do at the root joints. But it wasn't horrendous, but considering this is a kit aimed at 'beginners' any filling is a bit of an annoyance...
Not major gaps by any means but they do definitely need filling with modeller's putty and then sanding
smooth. A real beginner might not be ready to undertake such a job, even if 'we' think it's minor.
We are - for the pedantic among you - at panel 6 of the Airfix instructions now. And we are instructed to join the upper wings to the lower and the wing assembly to the fuselage.
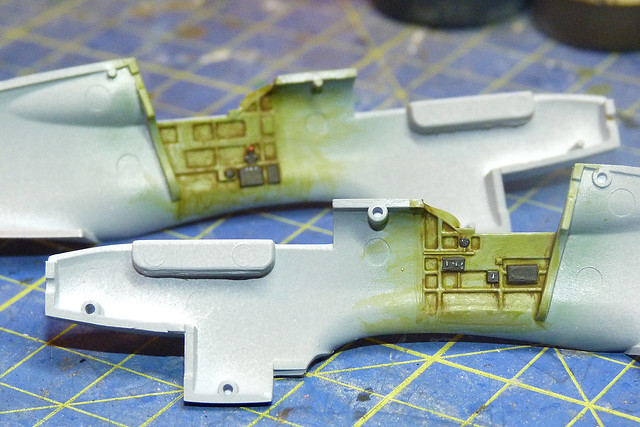
Before putting all these pieces together, however, the inner surfaces must be painted. The lower cockpit, pilot's set and control panel and the inside of the wings - which will be seen through the landing gear wells - all need a coat of the 'interior green'. I didn't care for the Hakata RAF Interior Grey-Green colour so I'm now having a go with Vallejo's Model Air [71.010] Interior Green.
I then shaded the green (using Vallejo's Game Colour Sepia Wash and some yellow artists ink) to give it the distinctive yellowish green that Curtiss used on the P-40's interiors...Or at least I tried. To be honest I'm still unclear whether or not the RAF repainted the Tomahawk's interior or whether they retained the original factory interior colour.
The hardest thing was resisting the temptation to dress up the standard Airfix cockpit by scratch-building this or that part or adding some of the excellent third-party upgrade parts. But I stuck to my guns and built the cockpit 'out the box'. And I don't think it looks too bad, the panel decal is a very nice touch.
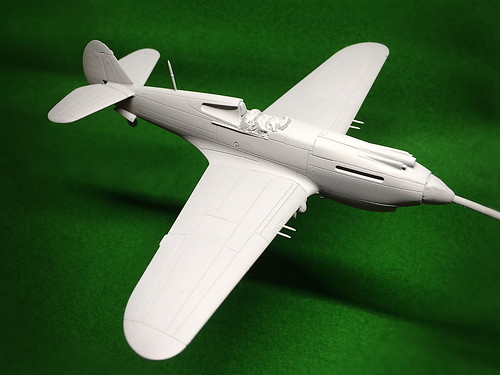
Time to get started with my Curtiss Tomahawk (at last). I've been looking forward to this, particularly as my initial look at the sprues really impressed me. The last time I made a Airfix aircraft kit was about 37 years ago - their old Me 110 I think - and things have certainly improved since then with hardly any flash and very crisp and well defined detail.
The panel detail on the Airfix P-40 is rather deep, but it's crisp and consistent so
I can live with it (advanced modellers might not appreciate it so much though).
The kit - one of the newer Airfix toolings - has a been met with some very positive reviews and although the line and panel detail is generally considered to be a little heavy handed it seems a very handsome rendition of the P-40. The bold detailing can be put down to it being a 'starter' (skill level 1) Airfix kit, the deeply inscribed line detail an advantage to those who have not yet mastered panel line painting techniques.
There is some cockpit wall detail, I'm happy enough with it but if it's a
little too basic you can buy third-party upgrade kits which add extra detail.
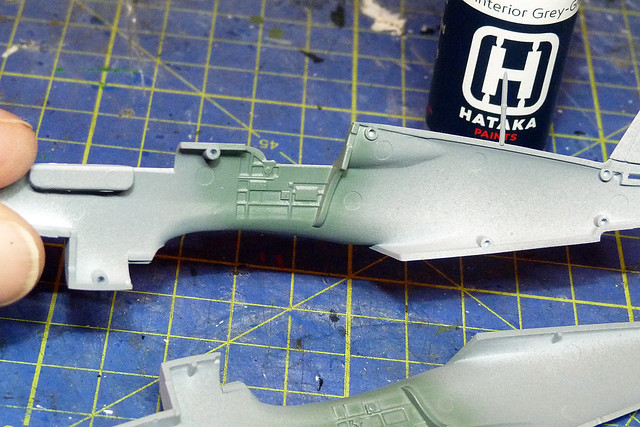
The first stage of the construction is the painting of the cockpit interior and then the mating of the two fuselage halves. I began by priming the interior with Humbrol's grey primer and then base coating the cockpit area with Hataka's Interior Grey-Green (from their RAF painting set).
Now, as usual with anything to do with scale modelling, there may be a bit of disagreement about exactly what colour to paint the cockpit interior. I have gone with Hataka's interior green because - simply put - I wanted to try out that paint. In actuality I *think* the Tomahawk's cockpit colour was probably the Curtiss factory default interior colour, RAF 'Interior Grey-Green' being for WW2 British manufactured aircraft.
The original Curtiss cockpit green is a lot more green than the RAF colour - my opinion is that the RAF would have simply painted the exteriors to RAF spec and not bothered with interiors (feel free to correct me). But, as I say, I really want to give the Hataka colour a go, to see how well it goes through my airbrush and see how much it needs to be thinned.
Hataka's RAF Cockpit Grey-Green, a more subdued green than the American
equivalent. But this test of this new make of paints went well, as they went
through my airbrush very nicely, coverage was good and smooth and it mixed
well with Vallejo's airbrush thinners.
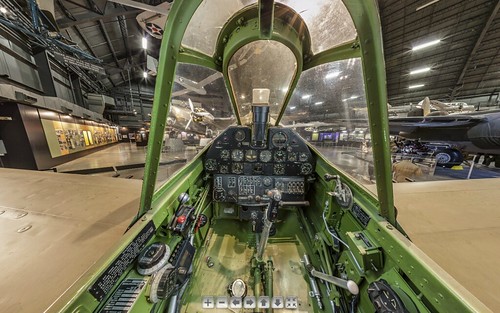
I was lucky enough to find a nice YouTube cockpit tour of an RAAF P-40N. Now P-40 cockpits change through the variants, of course, but this does give you a general indication of the colours of the different types of equipment.
Of course, the Airfix kit's cockpit is simplified so it's only going to be an impression of the P-40's instrument panels and controls. I played around with some colour modulation and washes and did a few blocks of colour to represent some of the controls, but my take on the cockpit is only a sketchy facsimile of the real thing...
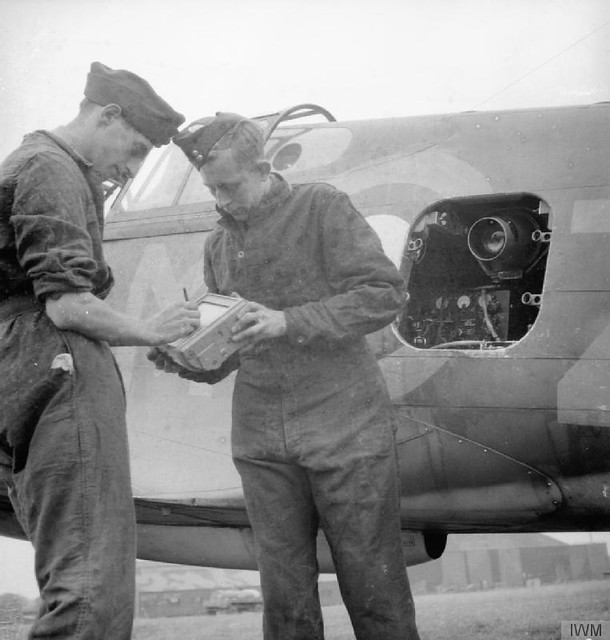
At this point the Airfix instructions direct you to glue the two halves of the fuselage together. However, the version of the Tomahawk I am making will be the RAF IIA version of No. 26 Squadron in 1941. These aircraft had photo-reconnaissance cameras fitted just behind the cockpit on the left side of the fuselage...
The camera lens can be seen through a hole situated at the top of a side hatch, over which the left hand roundel is painted. The camera equipment can be clearly seen in a photo available from the Imperial War Museum collection...
So, I will have to drill a hole through the hatch on this side of the kit fuselage. A fairly simple job, but I will want to create the look of a glass lens, perhaps with a piece of transparent plastic, recessed within the aperture...
I drilled through the panel then glued a piece of plastic to the inside of the fuselage, then the recess was painted with black Humbrol enamel. To make a lens-like effect I think I will handle this like I would one of the fake headlamps I have made for my truck models and fill the recess with some Pacer Forumula '560' Canopy Glue. If all goes well this should produce a clear 'lens'- but I will do this part after I have painted the model and added the decals (so we will have to wait and see how that works out).
And finally...
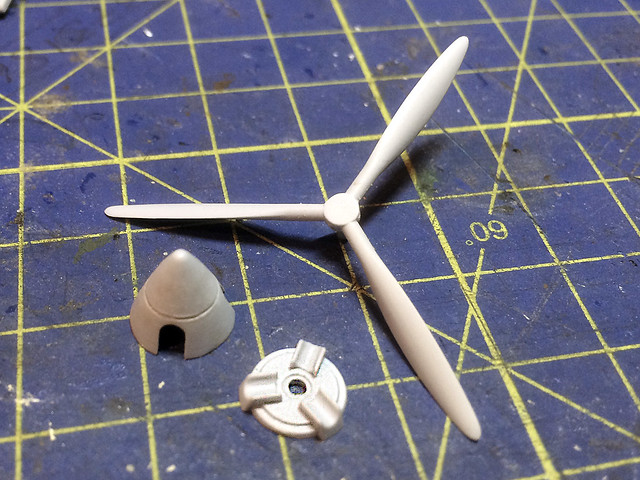
This post deals with the first two panels of the Airfix P-40 instructions. Obviously the main construction is the fuselage but the other little job is the assembly of the lovely propeller.
The Airfix P-40 prop assembly - three parts; prop blades, spinner boss and
end cap. All nicely moulded and a decent fit.
Again Airfix have done a nice job with these parts, the only criticism you can make is that they have overlooked the line that should mark where the top half of the spinner joins the bottom half. Ironic as everywhere else on the kit they have been keen to (over-)emphasise panel lines.
I put this line back in by running a craft knife around the spinner. Otherwise it's a nicely formed prop with no flash...
Prop assembled, but only for this photo as I will be painting the parts separately.
Here you can clearly see the line I drew around the spinner with my craft knife.
Next: It's onto the cockpit floor and the wing assembly.