Thursday 31 December 2015

Altaya 1/72 T-50 has arrived!

Bit of a post-Xmas treat as the posty brought this little beauty yesterday. My 1/72 Altaya die-cast T-50 light tank arrived...


It's a very nice reproduction of the little tank, but comes in Soviet colours (naturally enough I suppose). So, I will have to repaint this.

The 45mm gun is quite good (better than on my Pegasus kits) so it won't need replacing with one of the metal ones I bought. The tracks are 'ok', not brilliant really but acceptable for vinyl 'rubber band' type tracks.

In this 1944 photo you can clearly make out the Finnish three-colour camo pattern
and the additional head-lam fittings. Image source: SA Kua archive.
Checking over at Andreaslarka.net there isn't much modification needed to make it 'Finnish' - it looks like they only removed the very front of the fenders and added a couple of covered headlamps. Otherwise, the Finns used the Soviet T-50 as was (which is good news).

This will be my armour brigade command tank and I have a reference illustration of it - tank No. 601 - in use as a command tank in late 1944. It is painted with the standard Finnish 3-colour camo, with the Finnish crossed and the number '601' in yellow towards the rear of the turret.

Monday 28 December 2015

Roll out the barrel!

Having rectified my T-26 engine's air outlet cover grill, I only had the model's rather weedy 45mm gun barrel to replace. So, I placed an order with a Polish company - Model-making.eu - for six Aber metal barrels...

£2.15 each, they take the budget price of my Pegasus T-26 models up a bit.
The advantages are clear, the spindly Pegasus plastic 45mm gun barrels are poorly moulded. There is little chance to be able to drill out their barrel and, in any case, the muzzle doesn't have the appropriate rim. Plus, the metal version is perfectly turned, has no mould seam and is nice and straight.

Left: The original Pegasus barrel. Not the best.

I'm satisfied with the majority of the other features of the Pegasus model, really it's very nice even when compared to some of the display quality kits out there.

As a matter of fact, I also need this metal barrel for my excellent Mirage T-26 models. For some strange reason, Mirage included the original Finnish 37mm gun in their Finnish T-26 models instead of the Soviet 45mm gun (which the Finn's retro-fitted to all their versions as the war progressed). This then makes the Mirage models near perfect, and the best models available of the T-26 variants in 1/72.

Ex-Finnish T-26 Model 1933 light tank in the Bovington Tank Museum.
Source: Wikimedia

Friday 25 December 2015

Merry Modelling...I mean Christmas!

After an excellent birthday yesterday the merriment continues on this Christmas morning. So I just wanted to say a very Merry Festive Season/Holiday/Solstice/Christmas to you all!

I hope you all enjoyed yourselves and that Santa brought you something nice. I did very well, my brother gave me a very unexpected treat - a beautiful Black Dog 1/72 Centurion MK. III...


So I'm going to have an interesting new year as this is the most expensive and accurate (and complex) model I have undertaken to date. The research alone will keep me entertained for quite some time (as will the quandary as to whether to do a British Army example or an Israeli version).

May you workbenches be full and your carpet monster be well fed!

Merry Christmas friends.

Steve

Tuesday 22 December 2015

Finished with Finnish camo?

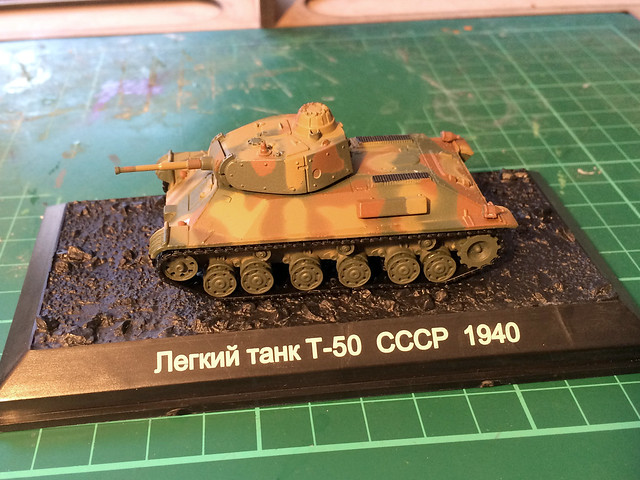
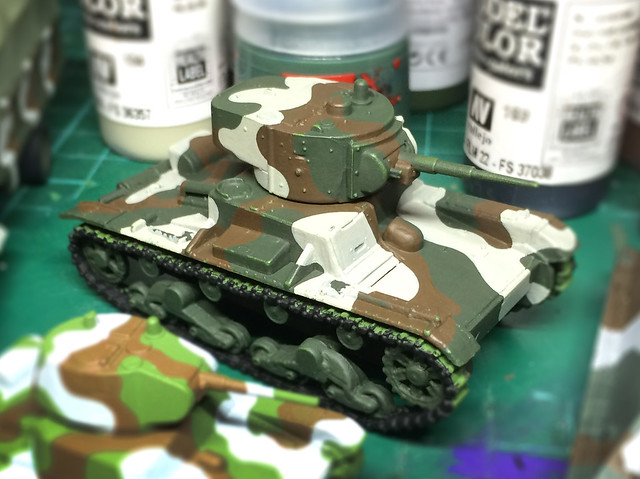
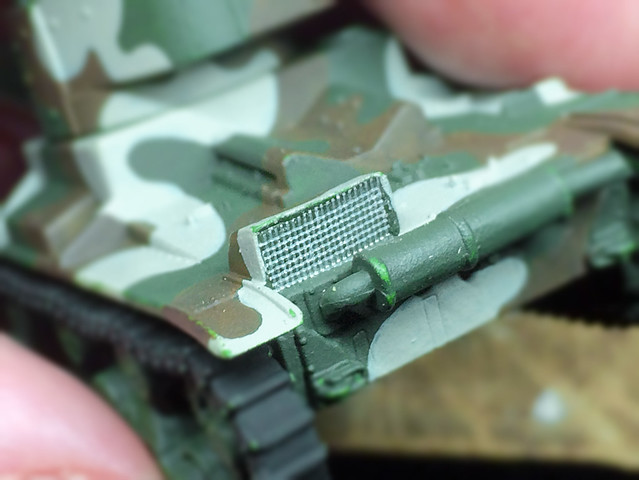
This has been a struggle, and I know you will think I have grossly belaboured the point, but getting the Finnish 3-Colour camouflage scheme right had been something of an obsession. And while I was somewhat satisfied (or is the word 'resigned') to my last work on the scheme - where I think I got close to the actual colour mix of the scheme - I received an email from Andreas Lärka (of Andreaslarka.net fame).

Andreas very kindly got back in touch with me - after having looked at my blog - with the following suggestion for the 3-Colour camo using Vallejo paints...

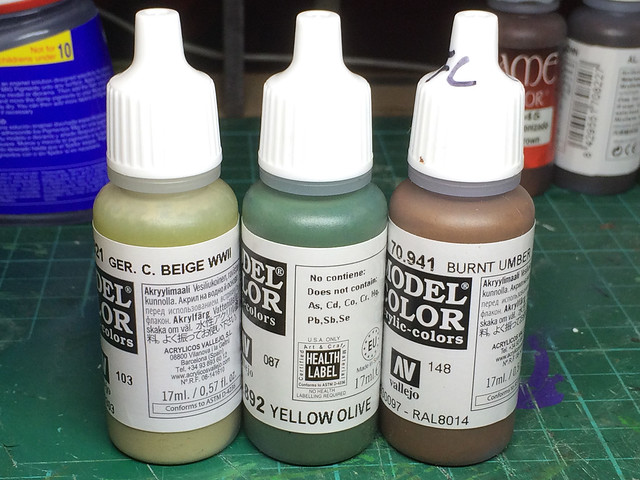
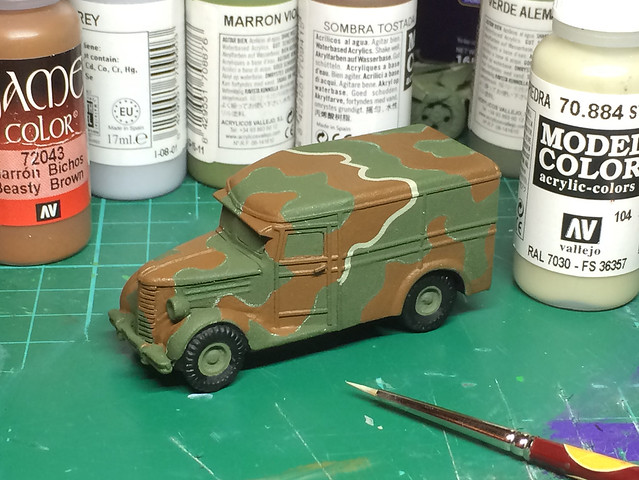
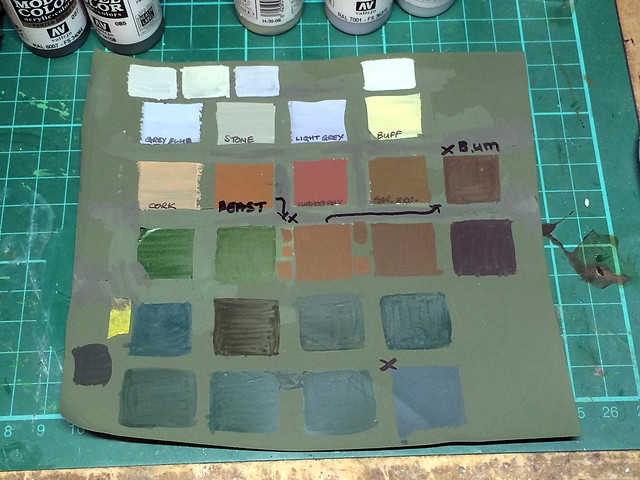
Moss green = 892 Yellow Olive
Sand Brown = 941 Burnt Umber
Light Grey = 821 German Camouflage Beige

Now, at first, my heart dropped as I have spent an inordinate amount of experimentation to get 'my mix' right. I dreaded this new recipe as I imagined it would brush away (excuse the pun) all my hours of work. So, it was with a heavy heart that I trudged down to my local hobby shop and duly bought Andreas's paint combo...


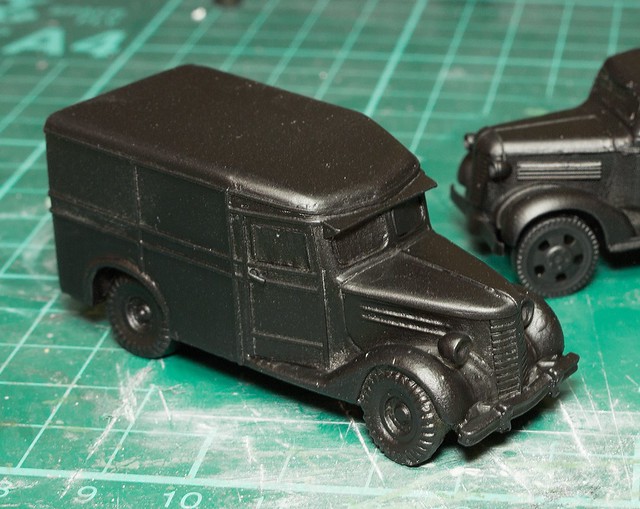
Well, in fact, I only had to buy two of the paints as - a spot of good news - was that I was already using Vallejo's Burnt Umber in my mix for the Finnish 'Sand Brown'. Quite pleased with myself about that, as it's nice to know I was at least on the right track with one out of the three (though I went a shade darker by adding some Vallejo 822 German Camo Black Brown).

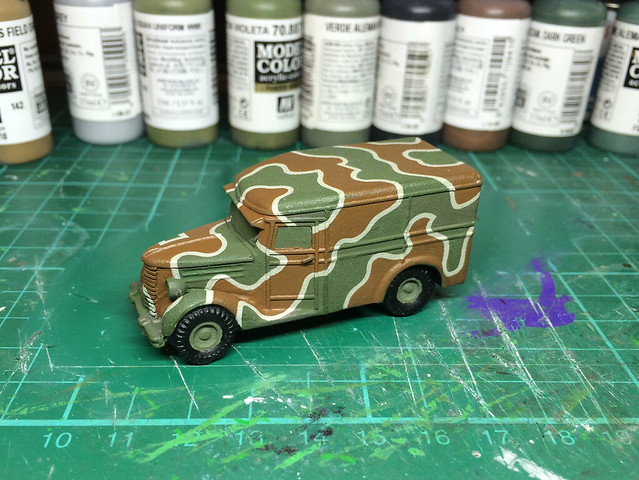
There was more good news when I got how and tried out some test swatches. The 'Yellow Olive' was almost exactly the same as my mix for the 'Moss Green' I couldn't believe it! That not only means that my colour mix is confirmed as the correct shade of green, but it also means I can use one bottle instead of my tricky mix of three bottles.


So, only the Finnish Grey - and here's where my luck run out...

Andreas suggestion for the grey was a pronounced beige, in line with the sand colour that many modellers and model manufacturers had been using but that I thought was inaccurate...Drat!

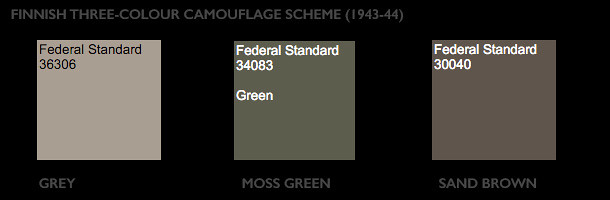
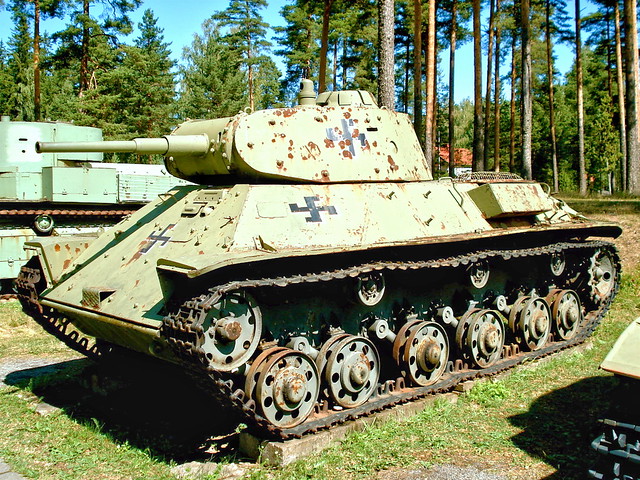
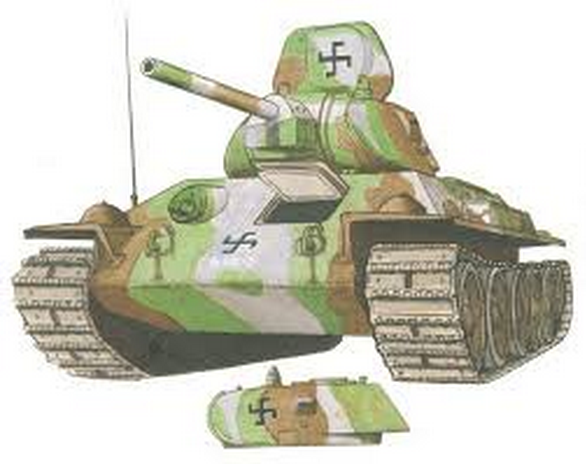
And to rub my nose in it, I just happened to be re-reading some books on the Finnish War and for a reference to their camo colour that I must have missed before. In Osprey's 'Tanks of Hitler's Easter Allies 1941-45' [New Vanguard #199, page 38] I found a note on the colours in the form of an paint standard called 'Federal Standard': Grey (~FS36306), Moss Green (~FS 34083), and Sand Brown (~FS 30040).


Double drat! It's looking more likely that the beige I thought was a misinterpretation, due to weathering and age, may have actually been the official Finnish 'Grey' after all. But I *still* think a word of mitigation is warranted, because if you then look at the illustration that accompanies this colour notation in the Osprey book you will find a nice picture of a Finnish 'Sturmi' (StuG III Ausg. G) with a suspiciously grey looking grey in its camo! (And, indeed, they go on to repeat this shade of sea-grey in the other two examples of Finnish armour they include in this section of the book!)

If, by now, you feel somewhat confused...Join the club!

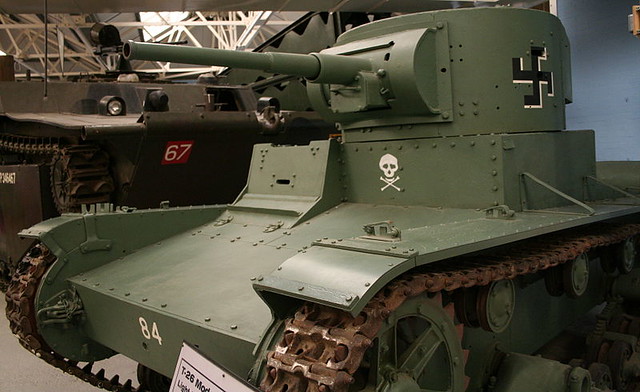
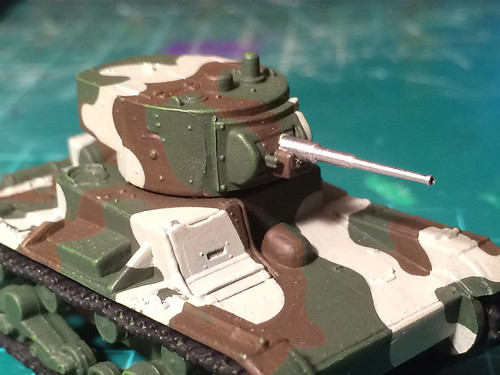
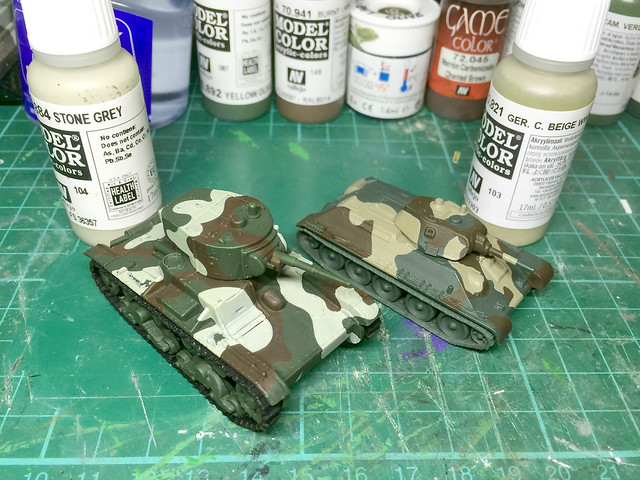
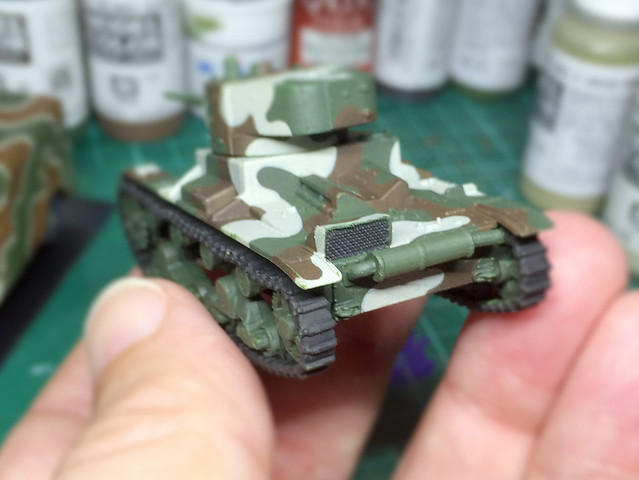
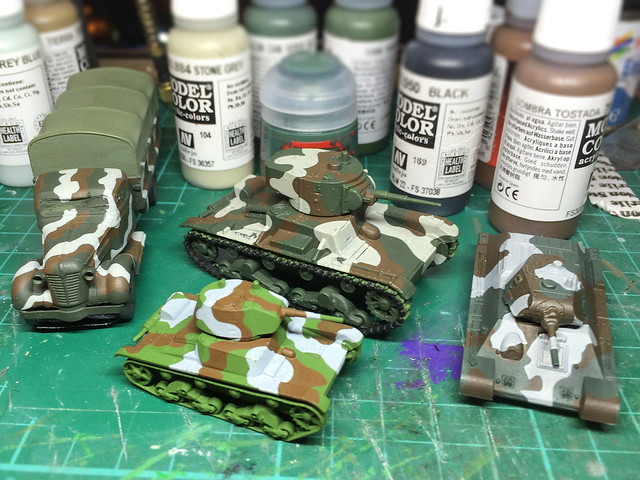
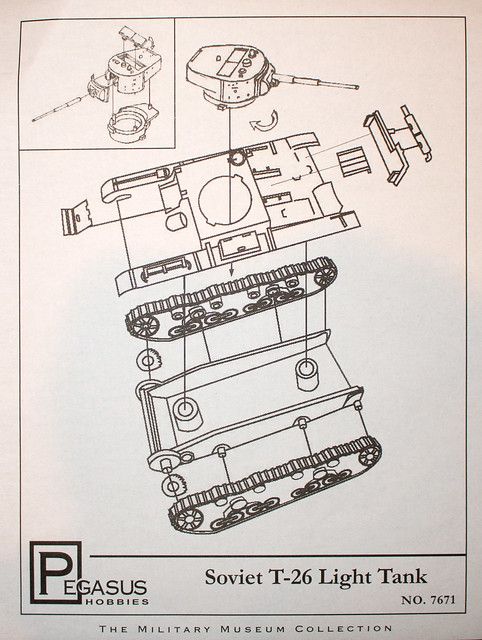
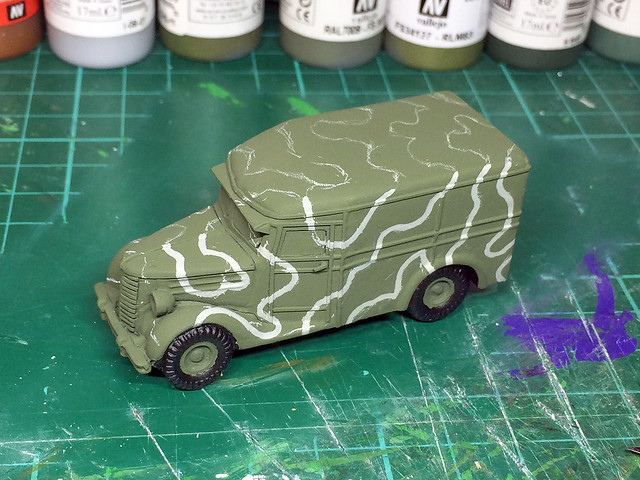
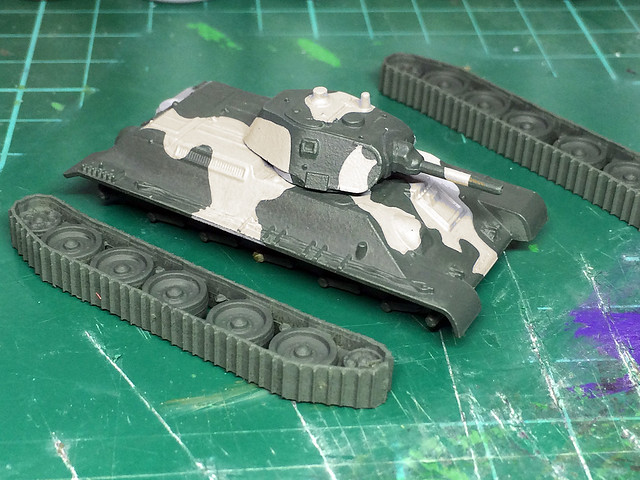
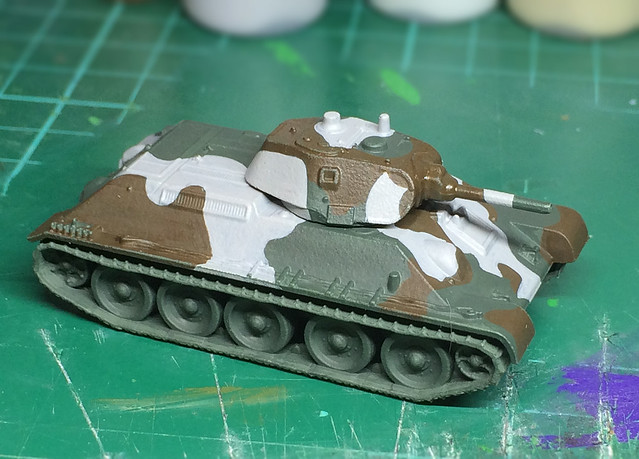
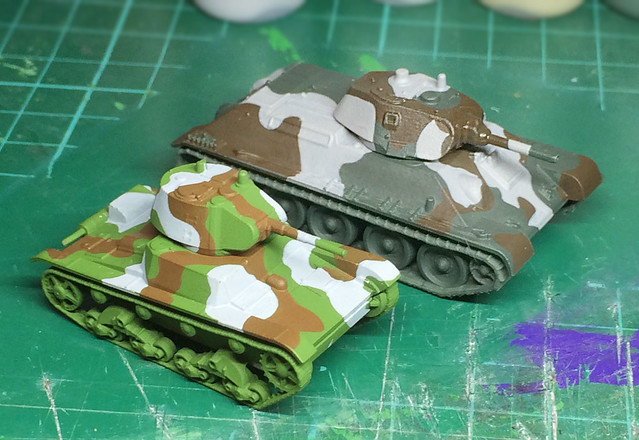
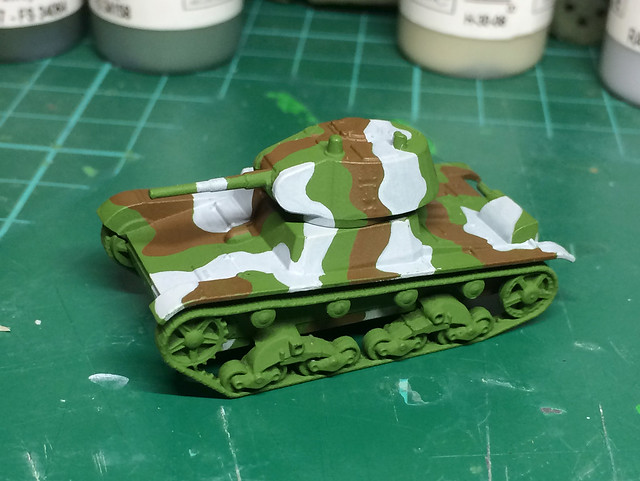
But, I decided to give the benefit of the doubt and I repainted my 1/100 test T-34 with the beige so I could compare it to my more grey oatmeal colour I used on my T-26...


Whoa! That's 
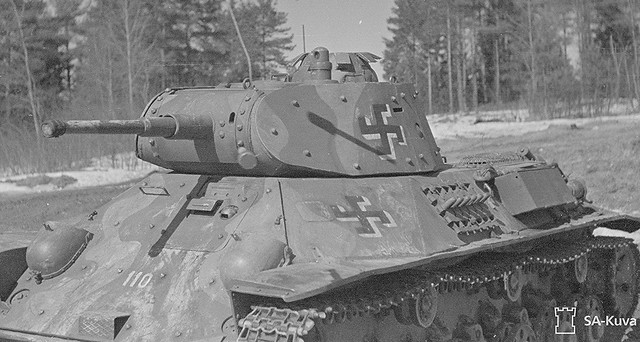
very beige, in fact, I would say it's fawn or light-tan. On the left, you can see my interpretation, which is a far lighter oatmeal grey (Vallejo's 'Stone Grey'). Now let's compare them to one of Andreas's photo references...

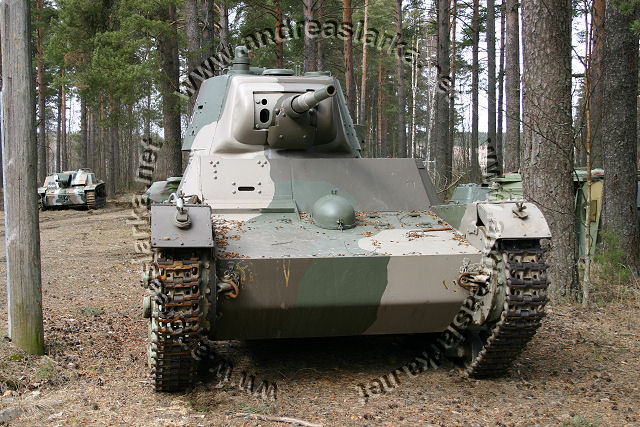
Copyright: Anreaslarka.net - no use without permission.
Now, I think my oatmeal is closer to the Finnish Grey in this photo than the German Camouflage Beige is. In fact, I'd say it's almost exactly halfway between my oatmeal and the beige. So...You guessed it...It's back to the palette again...


And finally...The Scale Effect
How can a colour change? That's what I have been asking myself while trying to get this Finnish Grey right. Of course, there is the modifier of weathering and age - colours fade - but I was also reminded of an optical effect which modellers know as the 'scale effect'.

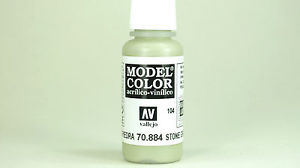
Long story short colours fade with distance - so while my Finish reference photos show a beige/cream grey close up the further away the photo the lighter and less cream and more grey that colour becomes. I became acutely aware of this when I looked closely at the colour in the bottle - in the bottle Vallejo's 'Stone Grey' looks spot on the grey/beige that you can see in Andreas's T-26 photo (above), but paint it out and then look at the result from 2 feet away and suddenly it become too light!

"...a model painted with the correct color scheme can still look artificial, if this scale effect isn’t taken into consideration. The best guideline is this: colors should appear more muted and less intense. With dark colors, a few drops of white can be mixed in. This softens black, for example. With light colors, a few drops of light grey can be mixed in." Painting Your Model For The Greatest Realism by Art Braunschweiger.

The further away I get from my test models the 'more correct' the lighter colours look in intensity when compared to the longer range photo reference I have. But this is all a very dark art, and as Michael Benolkin warns in his article called Color Scale Effects in Modeling, on the Cybermodeler web site:

"There is no one right answer to your modeling preferences. Some modelers don't worry about scale effect, some do. Different modelers apply precise degrees of scale effect to their work, others simply paint straight out of the bottle."

Phew! So, in the end, the decision is mine. At some point, I have to get off the fence and make a firm decision about 'Finnish Grey'. As a graphic designer, I am probably more worried about colour theory than most and apt to fret over it more than is healthy.

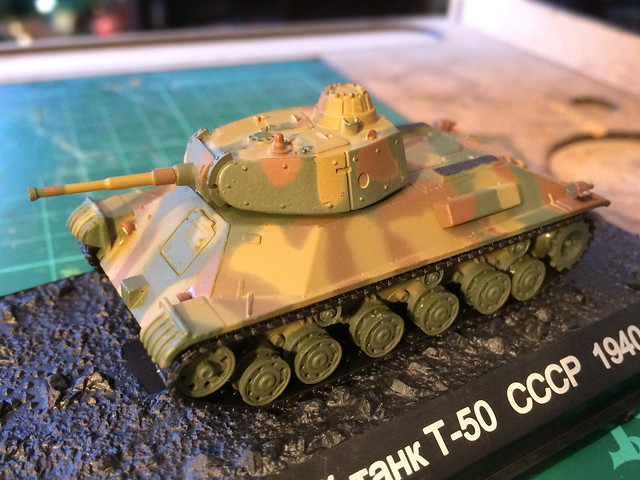
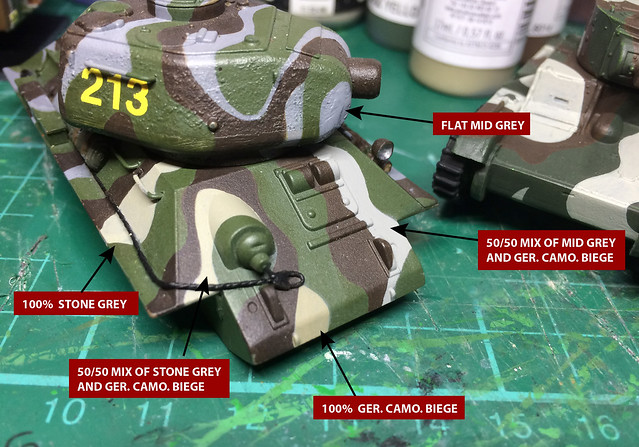
And so, here's my final (positively final) decision on the Finnish Grey...


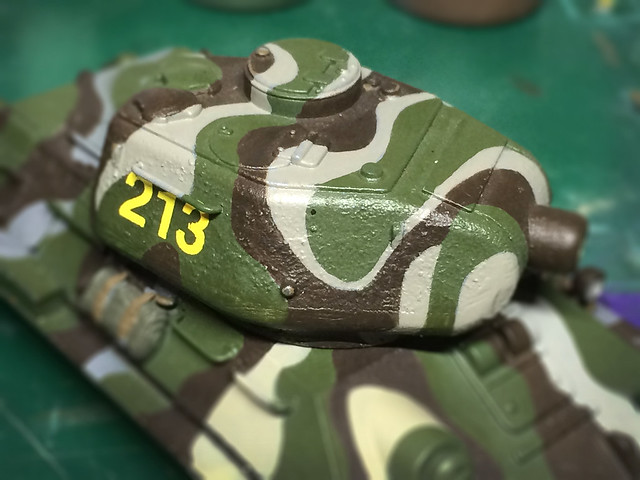
Here my long suffering test Finnish T-34/85 (I hate to say how many coats of paint this has had now) has my ultimate 'grey' mix. It's 2/3rds Vallejo Ger. C. Beige mixed with 1 third Medium Sea Grey. It has the creamy hint, but not the tannish beige of Ger. C. Beige on its own, and yet - from a distance - it has a touch of flat grey.

I must have it sort of right now because when you look at the model arms length you find yourself wondering whether it's beige or whether it's grey! I'd call that a success.

And so, that's my three Finnish colours done! (Honest...Really...No, really really!)

[If I get another email from Andreas I'll shoot myself!] ;)

...Seriously, a great big thank you to Andreas Lärka.

Postcript...I've just had an email from Andreas! BANG! ;)

Sunday 20 December 2015

Finnish T-26 m1933 - Part 4

Just a quickie...

I kinda put this project on the back-burner while I await the delivery of the replacement metal 45mm guns (coming from Poland). But I couldn't resist tinkering with the other 'not so good' aspect of this simple kit - the engine's 'blank' air outlet cover grill, this should have a mesh cover, but Pegasus have fudged this feature.

As it happened, I had bought some scale model mesh material - by Plus Model - and so I thought I might as well rectify Pegasus's omission.


The mesh material is available of different gauges - to suit different scales - and mesh patterns. They are also made out of different materials - some metallic and some, as in this case, a nylon mesh.

You simply cut out a patch of the material to suit your needs - you have to be a little careful as the nylon mesh has a tendency to fray...


I cut an oversized patch and glue it into place - using PVA glue - to help prevent the edges fraying. Then I trimmed the excess away with a razor blade (excuse the terrible photography)...


Even though I was careful I ended up losing the top row of my mesh, were this a display kit I would have had to start again! But as this is just for war gaming I decided to let it past as when it's painted I reckon you might not notice it.

So, there you go. If you have a radiator or other metallic grill (or even netting) there is a solution. I should say I hunted around for a cheap alternative, but even my good old stand-by - net curtain - didn't go down to this fine a mesh.

Postscript: Got the mesh painted in its basecoat black. It doesn't look too bad, so I will add this to all the other T-26s in my forth-coming unit. Just needs some dry-brushing to finish it off...


Thursday 17 December 2015

Finnish T-26 Light Tank companies

The final kit arrived to make up the six tanks I need for two companies under Rapid Fire's rules for the Finnish Continuation War. So, having sorted the camo colours we're all set to go!


As you can see, four of the T-26s are the Pegasus 'E-Z Build' m1933s, while the lead tank in either company will be a lovely Mirage 1/72 m1939 variant of the T-26. Technically, the two Mirage tanks are slightly different variation of the T-26, but the differences are negligible.

I would have really liked to have gotten my hands on a Vickers 'T-26E' - this was a Finnish variation based on the British Vickers 6 Ton tank (the design on which the Soviet T-26 is based). But I just couldn't find an example of this in plastic, resin or diecast.

 It's all a bit complicated but if you want to know all about the T-26 variants in Finnish use then visit this website for a detailed history: Jaegerplatoon.net - Vickers 6 Ton/T-26E tanks and Captured T-26 (ex-Soviet) tanks.

The 'E' in the Finnish T-26E stands for 'Englantilainen' (English/British), because of the Vickers heritage.

Now, I could have made a seventh T-26, as the Rapid Fire rules wargame rules specify an HQ tank for the armor brigade. But six similar vehicles was enough for me and so I am opting to make my HQ tank a captured Soviet T-50 light tank instead. (The Finns capture just one example of the T-50 light tank, and - as it happens - it was used as a command tank.)


I managed to find a diecast model of this less well-known tank on eBay for a nice price - so why the heck not.

Wednesday 16 December 2015

Finnish T-26 m1933 - Part 3

After a bit of umming and ahhing, I decided how I would equip my Finnish T-26 companies (2 x light tank units of 3 T-26s each). The Rapid Fire rules specify the inclusion of the Finn's T-26E variant, but I can't find a model that reflects that accurately. So I have settled on a unit configeration of two of the cheap Pegasus T-26 m1933s plus one very nice Mirage T-26 m 1939.

Anyway, back to the kit. I'm starting by doing a 'pilot' example of the Pegasus m1939, but noticed a couple of niggles (nothing big).


The tracks of the Pegasus model stick out a bit - they are supposed to be flush with the mudguards. So I ended up sanding down the stubby axels so that the tracks sat closer to the chassis. Also, the 45mm gun is a little bit weedy looking (and a bit bent). So, in this case, I am going to look and see if I can find a replacement metal gun on the internet.

I primed (or base painted really) the tank with a bright green - Humbrol's Grass Green - because I thought it might give a nice glow to the top coat which I am doing in my 'Finnish green' mix (a darker green). Be nice to see what effect this has.


I was brave and experimented with a 'washy' application of the dark green! It's a streaky in places so you can see the bright green undercoat in places. This might be quite nice as it gives a nice variation in tone (I suppose were this a 1/35 scale kit I would have created this effect a little more smoothly by pre-shading with an airbrush).

Does it work? Well, my preference I think is for a flat dark green though I know other might prefer the hint of the brighter green as it conforms to the idea of the Finnish designation of the colour as being 'Moss Green'. Here's a reliable reference photo from the excellent Andreaslarka.net...

Finnish T-26 m1939 on display at the Finnish Armour Museum. This clearly
shows the green as being the dark 'blue-green'. Picture source and copyright:
© Copyright by Andreas Lärka, Finland. Andreaslarka.net
I'm going to see how this runs when I apply the other camo colours - I can always return to my flatter dark green for the rest of my T-26s (and subsequent Finnish armour) if it doesn't 'wash'! ;)

Note the 'creamier' tone of the Finnish 'grey' on this tank. This is the warmer tone of grey I have been trying to reproduce by adding Vallejo's 'Stone Grey' to my mix. But notice how it is nowhere near the sand colour that some model manufacturers use in their painting instructions. (My recipe for my Finnish 'grey' is now about a 60/40 of Stone Grey to Pale Blue Grey paint.)

I'm quite pleased with it.

The results of my recent painting experiments, culminating to my 1/72 T-26.
My 'final' Finnish camo recipe..? So close, but not quite there yet.
I'm a little less pleased that my rough handling of the model during painting has rubbed off some of the dark green. But, then again, I do finish my painting process with a touching up session. Still, I'll have to try and be more careful.

As to the brown, I'm a tone too light and too red - I need a more flat-chocolate brown mix (I will tweak it to be a smidgen darker on my T-26 production run). In fact, I was greatly heartened by an email from Andreas from Andreas.net who said:

Quote: "The Finnish WWII camo was quite dark, so that is a thing to consider (even with the scale-effect)."

This reinforces my belief about the green and the brown. And while the grey is still quite light it will be calmed down a bit once I weather the model.

I continue to be annoyed with the weedy gun though...I will have to do something about that!

Credit: I would like to thank Andreas Lärka - of the excellent Andreaslarka.net fame - who has offered me his assistance (and importantly larger copies of his reference photos) which have helped me identify the colour hues that I am after.

Wednesday 9 December 2015

Finnish T-26 m1933 - Part 2

I seem to be on something of a model making frenzy - I now have 3 models on the go simultaneously. What could possibly go wrong?

Hopefully my T-26 adventure won't end badly!
Last night I started my Pegasus T-26 kit (or rather 'kits', as there are two in the box), these will be the start of a total of 6 or 7 T-26s that will form the 'light' element of my Finnish tank battalion. Because there are so many of these little buggers I am relying on the 'E-Z Build' budget kits that Pegasus excel in (though my lead 'HQ' tank will be an excellent Mirage T-26 m1939).

There are just 15 component parts to the Pegasus T-26, which take a lot of the strain off making so many of these models (especially for novice modeller like myself)...

One of the two tank sprue sets you get in the Pegasus T-26 box.
Despite being targeted at the war-gaming/young modeller market (hence the low component count) Pegasus manage to pack a decent level of detail into their models. I think they are superior to other 'quick build' makes like Armourfast, PSC and Italeri (though PSC make-up for their discrepancies in scale and accuracy by giving the modeller a lot of optional choices)...

Nice level of surface detail, down to rivets and tools (you wouldn't get these on
an Armourfast kit)!
Of particular note is Pegasus's one-piece tracks. While - as with all 'quick build' makes - the track links themselves are grossly simplified and not accurate, the general look and running gear is quite nicely done. They even model a bit of 'track droop' on the upper tracks...


Instructions are - as you can imagine ' brief, to say the least. And there is no paint suggestion or decal sheet included - these frivolities are left up to the model-maker to work out...


So, naturally, I soon had the first of my two T-26s put together, with just some minor trimming of sprue stubs (there was practically no flash to mention)...


And there we have it, all done in less than five minutes! It's no wonder these type of kits are popular with war-gamers (who might have large armies of vehicles to build for a game).

I am not  going to be adding any 'improvement's or fiddling around as - to be honest - the level of detail is fine and quite accurate right out the box. I may drill out the barrel of the 45mm gun, but honestly that's it.

On to the painting!

Monday 7 December 2015

Chevrolet Radio Van conversion - Part 7

Some good progress on my Finnish Chevy Radio Wagon. Generally, I am pleased with this model but that's more to do with what I have learned about scratch-building than the quality of the model (or painting) itself.


Black seems to be a good base for me as it gets into all the little nooks and panel lines and so helps provide some pre-shading of sorts.

The base colour I went for was my usual Humbrol Light Olive as you can take that colour either way. You can darken it with shading or bleach it with some streaking and highlighting. I believe proper modellers call this process 'modulation'.


Choice of camo scheme
As this vehicle is something of a 'what if', I have chosen a suitably speculative camp to go with it. It's actually a pre-1943 Finnish pattern - before they made a proper effort to standardise on a three-colour scheme. Though as little reference exists for what individual units did (it seems to have been mainly up to them) I went with a scheme I saw used on MW's model of a Finnish armoured AA truck (because I liked it)!


Having chosen that pattern, I then had to work out how to actually paint it. Airbrushing at this scale seemed out of the question (though technically not impossible with a lot of masking) so I plumped to go old-school with my brushes.

First thing was to outline the pattern using a soft white chalk pencil. This took a couple of attempts as the pattern has to 'wrap around' the vehicle and join up logically.


The good thing about using chalk to mark out the pattern is that you can easily erase it using some blue tack. (At this point I should mention that this initial try at drawing the pattern failed. I got a bit confused by all the lines and when I started painting I realised that the patches of colour would not join up correctly. So I have to re-apply the base coat and start again.)

My second attempt went better and I ended up with a reasonable end product. All the patches joined up properly and the balance between the two main colours was roughly 50/50.


The outlining with the oatmeal-grey was - as you can imagine - a bit of a bitch. It is also probably far neater than the real camouflage actually was applied! But that's a result of the graphic designer in me - lines have to be neat.

And that's where we have got to. I'm touching up a few things and then I will apply a satin varnish before weathering.


The main disaster (there's always one) was the horrendous base coat or rather the reapplication of the base coat. I applied it too thickly in my cold damp attic and it has crazed a bit. I thought o could get away with it but it really niggles me now, but I have gone too far to strip the paint back now (as I would have, were this a display model).

The moral: stick a heater on for half an hour or so before you spray with rattle- can aerosol paint!

Friday 4 December 2015

Finnish Camo painting tests - Part 2

Right, my first test scheme done (though not weathered yet), I'm moving onto the second of the camouflage patterns based on what I believe to be the correct colour set for WW2 Finnish armoured vehicles. This time, it's a more subdued interpretation of the Finn's 3-colour camo based on examples on display in various museums.

[Note: You might ask why I didn't just base my colour scheme on museum exhibits in the fist place - after all if they are in a museum they are bound to be authentic aren't they? Well, that's a can of worms I don't want to open - suffice to say very little original WW2 vintage Finnish paint schemes still exist, and where they do they are often faded and discoloured. So, in short, if you see a nice Finnish camo scheme in a museum the likelihood is that it is a modern repaint. So determining which of the schemes out there are the authentic ones can be a bit tricky.]

Anyway, 'nuff said - here is my second crack at 'a' Finnish 3-colour camo...(This time using a Zvezda 1/100 T-34 Model 1940 as the test-bed...)

1. Base colours. 
The basic colour I'm starting with is the green, and in this case - despite the official description of the Finn's green element being termed 'Moss Green' - research leads me to believe that the actual green of a 1941-45 3-colour Finnish camouflage pattern was a bluish-green.


I began with a primer coat of Humbrol's No. 30 Dark Green Matt acrylic spray, which is a slightly lighter bluish tinged green than my main coat will be. The main coat was then applied and consisted of a mix of Vallejos' [70920] German Uniform and a dash of [70979] German Camo Dark Green.

2. Grey(ish)
Next, I'm trying out a warm grey - which has a hint of oatmeal colour to it - which I have mixed using some Vallejo Model Color [70990] Light Grey and a dash of Vallejo [70884] Stone Grey...


Amusingly, this looks just grey in my photo which just goes to illustrate how tricky colour matching can be when using photography, Changes in light and exposure can 'warm' or 'cool' colours. You'll just have to take my word for it that there is a very subtle hint of Stone Grey (a soft beige) in there.

I am not going as far as some modellers go through and making this part of the 3-colour camo an obvious sandy-beige. Even model manufacturers - like Tamiya - tend to get very 'artistic' when it comes to interpreting this colour (they have gone full-blown sand).

3. 'Sand Brown'
My preference (note wording) for the type of brown which will represent the very loaded description of 'Sand Brown' is more of a mid-chocolate-brown. In my case, I have plumped for Vallejo's Model Color [70941] Burnt Umber...


The only issue I have with this is the shape of this pattern rather than the colours themselves. But apparently this is an authentic pattern so my personal aesthetics have little relevance. The brown turned out looking a little glossy for some reason, but I will be giving it a spray of matt varnish later so that should tone this down.

Well, that is the basic painting tests done, I'll need a little time to reflect on which I prefer. In the meantime, I will finish off the two test models with some weathering as they are quite nice in their own right.


Finnish camo painting tests - Part 1

I've done several posts about my attempts to understand the Finnish 3-Colour camouflage. I am hoping this is my final tussle with the issue. On the face of it, the job of painting a model of a piece of Finnish WW2 armour should be fairly straightforward - but as I have mentioned before there are a lot of varying interpretations of what is meant by the well-known colour recipe of Grey, Moss Green and Sand Brown. Here are two examples of how this simple recipe can get a little complicated...

This wonderful Finnish T-26 is by Ray Peterson. The colours - even though
weathered - are still quite vivid renditions of the Finnish 3-colour format.
On the other hand, here is an example of Tamiya's relatively new Finnish 'Sturmi'
Stug. This is one of Tamiya's own demo models (photo by Jens H. Brandal). As
you can see, it's quite a contrast to the T-26's colour scheme.
I decided that the easiest way to get a handle of what might look right would be simply to try out a few test models. This might sound a bit drastic but Zvezda makes some very cheap 1/100 models (£2.50) that are ideal for practising and experimenting with colours schemes and weathering techniques before applying them to your full-sized models.

First of all, I created a set of colour swatches so I could see some of the possibilities
available to me. As usual, the colours indicated on the bottles or in manufacturers
literature don't precisely match what comes out the bottles. Colours also 'change'
depending on what other colours they are painted onto so seeing my choices on
a mid-olive was quite an important starting point.
Reference source notes: This first variation attempt at the Finnish 3-colour camo is based upon modellers reference guides, the painting instruction of some model manufacturers and their box art and upon the work of other modellers. It's a vivid interpretation but in a literal sense conforms to the official description of the Finnish colours as being 'Moss Green', 'Sand Brown' and 'Grey'...


So, let's have a go...

I happened to already have an example of Zvezda's 1/100 scale T-26 light tank. This snapped together in less than a minute and I began my painting test with 'a' version of the Finnish Moss Green. I used Humbrol's acrylic 'Grass Green'...


This is pretty striking compared to the usual military olive drab or dark green. However, part of this experiment is to see how these various colour combinations or choices changes during weathering.

After the Moss Green I added the Grey element of the camo pattern. My choice for this was Vallejo's Model Color Pale Grey Blue [907]...


And finally, I added the 'Sand Brown' - which I interpreted in the form of Vallejo's Game Color Beasty Brown [72043] mixed with a little Model Color Burnt Umber [70941] to create a brown somewhere between the two browns used in the example models I show at the top of the page...


Well, that's my first attempt. Not so sure about the vivid green, but we shall see after the weathering stage (it might tone it dow a bit). The grey is a bit bright as well (in its pristine form) but I am quite happy with the brown.

Next I shall try out my alternative scheme - which will be a little more subdued - and then I can compare the looks and choose what I think it the most authentic.